本文为个人学习记录,由于我也是初学者可能会存在错误,如有错误请指正
Vue.js速查手册:
html速查手册
一、VUE
0.常用指令
npm create vite@latest //创建项目
npm run dev //启动项目
1.1目录解析
scr\main.ts
import { createApp } from 'vue' //从vue中引入函数
import './style.css' //导入样式
import App from './App.vue' //导入好的vue文件
createApp(App).mount('#app')//使用vue中函数创建App 并且挂载到index.html中id为app的div中
src\App.vue
<template>//组件结构
<div class="app">
<h1>你好</h1>
</div>
</template>
<script lang="ts">
export default{
name:'App'//组件名
}
</script>
<style>//组件样式
.app{
background: #ddd;
box-shadow: 0 0 10px;
border-radius:10px ;
padding:20px;
}
</style>
-
vite项目中,index.html是项目的入口文件,在项目的最外层 -
加载
index.html后,vite解析<script type="module" src="xxx"> </script>指向的JS -
vue3中是通过createApp的函数创建一个应用实例
Vue2实例解析
vue2是Option API,数据方法计算属性等,是分散在:data、methods、computed,牵一发动全身;例:
export default {
    name:'',
    data(){
    },
    methods:{
    }
}
src\App.vue会自动挂载到index.html中
<!doctype html>
<html lang="en">
  <head>
    <meta charset="UTF-8" />
    <link rel="icon" type="image/svg+xml" href="/vite.svg" />
    <meta name="viewport" content="width=device-width, initial-scale=1.0" />
    <title>Vite + Vue + TS</title>
  </head>
  <body>
    <div id="app"></div>//解析位置 与id相关 App.vue中挂载的位置
    <script type="module" src="/src/main.ts"></script>
  </body>
</html>
创建Person组件位于src\components\Person.vue 就是将class为person的div封装成组件
<template>
    <div class="person">
        <h2>姓名:{{name}}</h2> //调用default中的data函数中的name属性
        <h2>年龄:{{age}}</h2> //调用default中的data函数中的age属性
        <button @click="changeName">修改名字</button> //绑定单击事件changeName
        <button @click="changeAge">修改年龄</button> //绑定单击事件changeAge
        <button @click="showTel">展示联系方式</button> //绑定单击事件showTel
        <h2>电话:{{tel}}</h2>
    </div>
</template>

<script lang="ts">
export default {//将此段JSON暴漏出去
    name:'Person',//组件名称
    data(){
        return {
            name : '张三',
            age : 18,
            tel:'138888888'
        }
    },
    methods:{
        changeName(){
            this.name = "LY_C"
        },
        changeAge(){
            this.age += 1
        },
        showTel(){
            alert(this.tel)
        }
    }
}
</script>

<style scoped>
    .person{
        background: skyblue;
        box-shadow: 0 0 10px;
        border-radius:10px ;
        padding:20px;
    }
</style>
将Person组件导入到src\App.vue
<template>
    <div class="app">
        <h1>你好</h1>
        <Person /> //写入根标签 设置组件位置
    </div>
</template>

<script lang="ts">
    import Person from './components/Person.vue'//导入组件

    export default{
        name:'App',
        components:{Person} //挂载组件到App之下
    }
</script>
...
二、Vue3
Vue3是Composition API,将打散的data、methods、computed按功能合并成一个functior
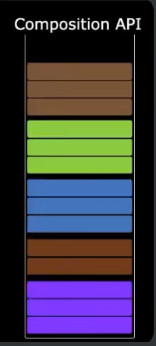
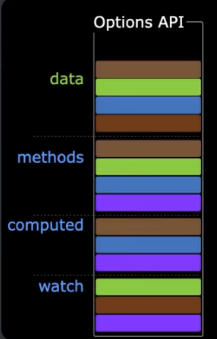
2.1 setup概述
setup是vue3中的一个新的配置项,它是Composition API的表演舞台,组件中所用到的:数据、方法、计算属性、监视等等,均配置在setup中,setup中无this关键字
<!-- vue2 -->
<script lang="ts">
export default {//将此段JSON暴漏出去
    name:'Person',
    data(){
        return {
            name : '张三',
            age : 18,
            tel:'138888888'
        }
    },
    methods:{
        changeName(){
            this.name = "LY_C"
        },
        changeAge(){
            this.age += 1
        },
        showTel(){
            alert(this.tel)
        }
    }
}
</script>

<!-- Vue3 -->
<script lang="ts">
export default {
    name: 'Person',
    setup(){
        //数据 非响应式
        let name = "张三"
        let age = 21
        let tel = 1388888888
        //方法
        function changeName(){
            name = "LY_C"
        }
        function changeAge(){
            age += 1
        }
        function showTel(){
            alert(tel)
        }
        return {name,age,changeAge,changeName,showTel}//返回一个对象
    }
}
</script>
setup的返回值可以是一个渲染函数,返回的函数可以是lamdba
<script lang="ts">
export default {
    name: 'Person',
    setup(){
		...
        return () => '哈哈'
    }
}
</script>
注意
暴漏的数据中vue3的setup函数优先级高于data、methods、computed,所以vue2的写法可以和vue3同时存在,并且vue2中的可以获得setup中的数据和函数,setup中无法访问vue2中的数据和函数 如果vue2中的函数和变量和setup中的冲突,则选择setup中的引用
<script lang="ts">
export default {
    name: 'Person',
    data(){
        return {
            a : 100,
            c :this.name //读取setup中的数据 必须加上this
        }
    },
    methods:{
        b(){
            console.log("b");
        }
    },
    setup(){
        //数据 非响应式
        let name = "张三"
        let age = 21
        let tel = 1388888888
        //方法
        function changeName(){
            name = "LY_C"
        }
        function changeAge(){
            age += 1
        }
        function showTel(){
            alert(tel)
        }
        return {name,age,changeAge,changeName,showTel}
    }
}
</script>
2.2 setup语法糖
2.2.1 省去return
将setup中的函数和变量 单独写入一个script中
由于setup函数添加新函数和变量需要重新return 特别麻烦,所以将setup中的代码改为一下形式,该形式会自动return
<script lang="ts">
export default {
    name: 'Person',
}
</script>
<script lang="ts" setup>
    let name = "张三"
    let age = 21
    let tel = 1388888888
    let address = "河南省郑州市"
        //方法
    function changeName(){
        name = "LY_C"
        console.log("123456");
    }
    function changeAge(){
        age += 1
    }
    function showTel(){
        alert(tel)
    }
</script>
注意
如果想要使用该语法糖,必须将script中使用同一种语法即ts或者js,推荐使用ts,在script中加入指定语言 <script lang="ts">
2.2.2 省去模块名单独script
使用扩展支持将 组件名引入到setup的script中 进一步简化操作
需要使用以下指令安装扩展支持
npm i vite-plugin-vue-setup-extend -D
将插件引入到项目中,在vite.config.ts中写入
import { defineConfig } from 'vite'
import vue from '@vitejs/plugin-vue'
import VueSetupExtend from 'vite-plugin-vue-setup-extend' //引入setup扩展支持

// https://vitejs.dev/config/
export default defineConfig({
  plugins: [
    vue(),
    VueSetupExtend()//开启扩展支持
  ],
})
直接将name属性加入到setup 中的 script标签中
<script lang="ts" setup name="Pseron123"> //直接加入模块名
	...
</script>

2.3 ref基本数据类型响应化
在vue2的data中 默认就为响应式数据,在vue3中默认非响应式
在模块srcipt中引入ref函数,并使用ref()函数将需要响应式的基本类型变量导入
<script lang="ts" setup name="Pseron">
    import {ref} from "vue"//引入ruf

    let name = ref("张三")//调用ref数据进行响应式化
    let age = ref(21)
    let tel = 1388888888
    let address = "河南省郑州市"
    console.log(1,name);
    console.log(2,age);
    console.log(3,tel);
    console.log(4,address);

    function changeName(){
        name.value = "LY_C"//修改value属性
    }
    function changeAge(){
        age.value += 1
    }
    function showTel(){
        alert(tel)
    }
</script>
注意
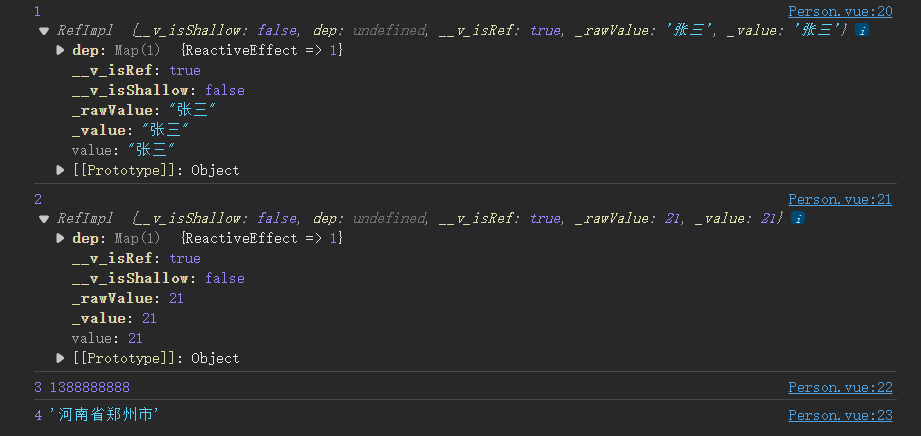
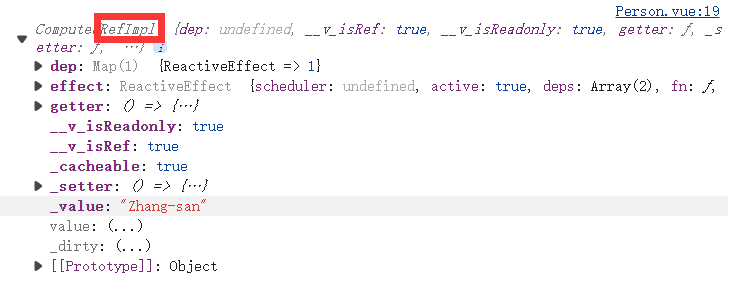
ref函数实际上是将字符串转为RefImpl类,所以在js中修改数据时修改的是value属性,又由于vue 模板中自动解析value属性所以不用刻意引用value属性
<template>
    <div class="person">
        <h2>姓名:{{ name }}</h2>
        <h2>年龄:{{ age }}</h2>
        <h2>地址:{{ address }}</h2>
        <button @click="changeName">修改名字</button>
        <button @click="changeAge">修改年龄</button>
        <button @click="showTel">展示联系方式</button>
        <!-- <h2>电话:{{ tel }}</h2> -->
    </div>
</template>
2.4 对象数据类型类型响应化
在模块srcipt中引入reactive()函数,并使用reactive()函数将需要响应式的对象类型变量导入
<template>
    <div class="person">
        <h2>一辆:{{car.brand}},价值{{car.price}}万</h2>
        <button @click="changePeice">修改汽车价格</button>
        <br>
        <h2>游戏列表</h2>
        <ul>
            <li v-for="g in games" :key="g.id">{{g.name}}</li>
        </ul>
        <button @click="changeFistGameName">修改第一个游戏名字</button>
    </div>
</template>

<script lang="ts" setup name="Pseron">
    import {reactive} from 'vue'
    let car = reactive({brand:"XiaoMI",price:21})
    let games = reactive([
        {id:"game1",name:"王者荣耀"},
        {id:"game2",name:"原神"},
        {id:"game3",name:"三国志"}
    ])
    function changePeice(){
        car.price += 10;
    }
    function changeFistGameName(){
        games[0].name = "洛克王国"
    }
</script>
注意
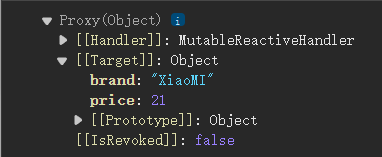
使用reactive()会将对象转为Proxy,数据都在Target中。reactive()处理是深层次的,也是就是说不管嵌套几层对象,都会进行相应化处理
2.5 ref对象数据类型相应化
和ref基本数据类型相应化一样,修改数据必须要获取value属性。表面上是用的ref创建了对象相应化,本质上还是调用了reactive
<script lang="ts" setup name="Pseron">
    import {ref} from 'vue'

    let car = ref({brand:"XiaoMI",price:21})
    let games = ref([
        {id:"game1",name:"王者荣耀"},
        {id:"game2",name:"原神"},
        {id:"game3",name:"三国志"}
    ])

    function changePeice(){
        car.value.price += 10;
    }
    function changeFistGameName(){
        games.value[0].name = "洛克王国"
    }
</script>
2.6 ref对比reactive
对ref进行数据修改时必须加上value属性
reactive重新分配对象时,会变成非响应式
<script lang="ts" setup name="Pseron">
    import {ref,reactive} from 'vue'

    let car = reactive({brand:"XiaoMI",price:21})
    let sum = ref(0)

    function changeCar(){
        car = {brand:"雅迪",price:1} //不生效 无法直接修改
    }

</script>
使用Object.assign()将对象加到响应式数据中,已达到更换对象依旧保持响应式的目的,该函数会把非第一个对象都加到第一个对象中
<script lang="ts" setup name="Pseron">
    import {ref,reactive} from 'vue'

    let car = reactive({brand:"XiaoMI",price:21})

    function changeCar(){
        Object.assign(car,{brand:"雅迪",price:1})
    }

</script>
由于修改ref中的值是使用value属性,所以ref能够直接更换对象
<script lang="ts" setup name="Pseron">
    import {ref,reactive} from 'vue'

    let car = ref({brand:"XiaoMI",price:21})

    function changeCar(){
        car.value = {brand:"雅迪",price:1}
    }

</script>
使用原则
若需要一个基本类型的响应式数据,必须使用
ref若需要一个响应式对象,层次不深则,
ref和reactive都可以若需要一个响应式对象,且层次较深,推荐使用
reactive
2.7 响应式数据解构赋值
将reactive对象解构并且保持相应化
2.7.1 reactive toRefs函数
使用toRefs函数将reactive对象转为多个Ref组成的对象
<script lang="ts" setup name="Pseron">
    import {reactive,toRefs} from 'vue'
    let person = reactive({
        name:"LY_C",
        age:21
    })
    let {name,age} = toRefs(person)
    //name = ref(perosn.name)
    //age = ref(perosn.age)
    function changeAge(){
        age.value += 1
    }
    function changeName(){
        name.value += "~"
    }
</script>

2.7.2 reactive toRef函数
使用toRef函数将reactive对象中的一个属性转为Ref对象
<script lang="ts" setup name="Pseron">
    import {reactive,toRefs,toRef} from 'vue'
    let person = reactive({
        name:"LY_C",
        age:21
    })
    let nl = toRef(person,"age");
    //nl = ref(perosn.age)
    function changeAge(){
        nl.value += 1
    }
</script>

2.8 computed属性
vue模板应当保持简洁,计算属性就是为了保持简洁而推出的,在vue3中的计算属性为vue中的computed()函数,计算属性有一个特点就是当数据源发生改变时,计算属性重新进行计算。(此属性改变是数据源发生的改变引起的,并非对计算属性的直接修改)
<template>
    <div class="person">
        姓:<input type="text" v-model="firstName"><br >
        名:<input type="text" v-model="lestName"><br >
        全名:<span> {{fullName}} </span>
    </div>
</template>

<script lang="ts" setup name="Pseron">
    import { ref , computed } from 'vue'; //导入计算属性 computed

    let firstName = ref("zhang")
    let lestName = ref("san")

    let fullName = computed( () => {
        return firstName.value.slice(0,1).toUpperCase() + firstName.value.slice(1) + '-' + lestName.value
    } )
</script>
计算属性有缓存,如果有重复输出一个属性时,计算属性只会运行一次,而方法不会
注意
计算属性为只读属性,并且是ref即读取数据时需要读取value属性
2.8.1计算属性的get和set函数
当计算属性的数据源发生改变时会调用get函数,当计算属性的value被重新赋值时会调用set函数
<script lang="ts" setup name="Pseron">
    import { ref , computed } from 'vue'

    let firstName = ref("zhang")
    let lestName = ref("san")

    let fullName = computed({
        get(){
            return firstName.value.slice(0,1).toUpperCase() + firstName.value.slice(1) + '-' + lestName.value
        },
        set(val){
            const [str1,str2] =  val.split('-')
            firstName.value = str1
            lestName.value = str2
        }
    })

    function changeFullName(){
        fullName.value = "li-si" //自动调用set函数 set("li-si")
    }
</script>
2.9 watch属性
watch只能监视以下四种数据
ref定义的数据
reactive定义的数据函数的返回值(
getter函数)一个包含上述内容的数组
2.9.1 监视ref定义的基本类型
<template>
    <div class="person">
        <h1>情况一:监视ref定义的基本数据类型</h1>
        <h2>当前求和为{{sum}}</h2>
        <button @click="changeSum()">点我+1</button>
    </div>
</template>

<script lang="ts" setup name="Pseron">
    import { ref , watch } from 'vue';
    let sum = ref(0);

    watch(sum,(newValue,oldValue) => {
        console.log("sum变化了",newValue,oldValue);
    })

    function changeSum(){
        sum.value += 1
    }
</script>
解除监视,watch的返回值是一个函数,在watch中调用自身返回函数即可解除监视

<script lang="ts" setup name="Pseron">
    import { ref , watch} from 'vue';
    let sum = ref(0);

    const stopWatch = watch(sum,(newValue,oldValue) => {
        console.log("sum变化了",newValue,oldValue);
        console.log(stopWatch);

        if(newValue >= 10){
            stopWatch()//解除监视
        }
    })

    function changeSum(){
        sum.value += 1
    }
</script>
2.9.2 监视ref定义的对象类型
2.9.2.1 监视对象整体
使用watch监视ref定义的对象整个地址值,即wacth函数第一个参数为对象,只有整体发生改变时,才会触发监视
<script lang="ts" setup name="Pseron">
    import { ref , watch } from 'vue';

    let person = ref({
        name : "张三",
        age : 21
    });

    function changeName(){
        person.value.name = "LY_C"
    }

    function addAge(){
        person.value.age += 1
    }

    function changePerson(){
        person.value = { name:"嘿嘿" ,age: 22 } //触发监视
    }

    watch(person,(newValue,oldValue) => {
        console.log('peron变化了',newValue,oldValue);
    })
</script>
2.9.2.2 监视对象的属性值
开启watch深度检测
在watch函数第三个参数中加入{deep:true},则会触发深度监视即监视每个属性,当任意一个属性发生改变时,则触发监视
<script lang="ts" setup name="Pseron">
    import { ref , watch } from 'vue';

    let person = ref({
        name : "张三",
        age : 21
    });

    function changeName(){
        person.value.name = "LY_C" //触发监视
    }

    function addAge(){
        person.value.age += 1 //触发监视
    }

    function changePerson(){
        person.value = { name:"嘿嘿" ,age: 22 } //触发监视
    }

    watch(person,(newValue,oldValue) => {
        console.log('peron变化了',newValue,oldValue);
    },{deep:true,immediate:true})// 深度检测开启 立即检测开启
    //当立即检测开启时 监视开始运行就会执行第二参数
</script>
注意
即使开启深度检测,但是newValue和oldValue调用的是对象地址,所以会出现修改单一属性时newValue和oldValue一致的情况。

2.9.3 监视reactive定义的对象类型
由于reactive()创建的对象类型不能直接修改整体对象,是使用Object.assign()方法进行修改属性,该方法本质是修改特定的属性,对属性修改的操作会触发监视器(默认开启深度监视)
<script lang="ts" setup name="Pseron">
    import { reactive , watch } from 'vue';

    let person = reactive({
        name : "张三",
        age : 21
    });

    function changeName(){
        person.name = "LY_C" //触发监视
    }

    function addAge(){
        person.age += 1 //触发监视
    }

    function changePerson(){
        Object.assign(person,{name:"LY_C",age:22}) //触发监视
    }

    watch(person,(newValue,oldValue) => {
        console.log("pesron发生改变",newValue,oldValue);
    })
</script>
2.9.4 监视对象类型的某个属性
若该属性不是对象类型,需要写成函数形式
若该属性值是对象类型,可以直接编写,也可写成函数,不过建议写成函数
将需要被监视基本类型的属性当作getter函数的返回值并作为watch第一个参数,即可监视特定的属性
<template>
    <div class="person">
        <h2>姓名:{{person.name}}</h2>
        <h2>年龄:{{person.age}}</h2>
        <h2>汽车:{{person.car.c1}}、{{person.car.c2}}</h2>
        <button @click="changeName">修改名字</button>
        <button @click="changeAge">修改年龄</button>
        <button @click="changeOneCar">修改第一台车</button>
        <button @click="changeTwoCar">修改第二台车</button>
        <button @click="changeCar">修改整个车</button>
    </div>
</template>

<script lang="ts" setup name="Pseron">
    import { reactive , watch } from 'vue';

    let person = reactive({
        name : "LY_C",
        age : 22,
        car : {
            c1 : "奔驰",
            c2 : "XiaoMI"
        }
    })

    function changeName(){
        person.name += "~"
    }

    function changeAge(){
        person.age += 1; //触发监视器
    }

    watch(
        () => person.age ,
        (newValue,oldValue) => {
        console.log("age发生改变",newValue,oldValue);
    })

</script>
当监视的属性是一个对象时,直接监视对象只能监视到属性变化,不能监视到整个对象的改变;使用函数形式时,只能监听到整个函数的改变。使用函数形式并且开启深度监听,即可监听整个对象的变化也可监听对象某个属性的变化
<script lang="ts" setup name="Pseron">
    import { reactive , watch } from 'vue';

    let person = reactive({
        name : "LY_C",
        age : 22,
        car : {
            c1 : "奔驰",
            c2 : "XiaoMI"
        }
    })

    function changeName(){
        person.name += "~"
    }

    function changeAge(){
        person.age += 1;
    }

    function changeOneCar(){
        person.car.c1 = "雅迪"
    }

    function changeTwoCar(){
        person.car.c2 = "宝马"
    }

    function changeCar(){
        person.car = {
            c1 : "劳斯莱斯" ,
            c2 : "兰博基尼"
    }}

    watch(
        () => person.car,
        (newValue,oldValue) =>{
        console.log("car发生改变",newValue,oldValue); //changeCar激发监听
    })

    watch(person.car,
        (newValue,oldValue) => {
        console.log("car发生改变",newValue,oldValue); //changeOneCar 和 changeTwoCar激发监听
    })

    watch(
        () => person.car,
        (newValue,oldValue) =>{
        console.log("car发生改变",newValue,oldValue);
    },{deep:true}) // changeCar 、changeOneCar 和 changeTwoCar激发监听
</script>
2.9.5 监视多个数据
就是将上方的多种情况融合,将watch函数的第一个参数写成数组
<script lang="ts" setup name="Pseron">
    import { reactive , watch } from 'vue';

    let person = reactive({
        name : "LY_C",
        age : 22,
        car : {
            c1 : "奔驰",
            c2 : "XiaoMI"
        }
    })

    function changeName(){
        person.name += "~"
    }

    function changeAge(){
        person.age += 1;
    }

    function changeOneCar(){
        person.car.c1 = "雅迪"
    }

    function changeTwoCar(){
        person.car.c2 = "宝马"
    }

    function changeCar(){
        person.car = {
            c1 : "劳斯莱斯" ,
            c2 : "兰博基尼"
    }}

    watch( [() => person.name , () => person.car.c1] , //数组
    (newValue,oldValue) => { //参数都为数组
        console.log("姓名和第一台车发生改变",newValue,oldValue); //changeOneCar 和 changeName 激发监视
    })

</script>
2.10 watchEffect
wacthEffect函数无需写被监视的属性,只需要写触发监视的逻辑即可,并且默认开启立即检测
<script lang="ts" setup name="Pseron">
    import { ref , watchEffect } from 'vue';

    let temp = ref(10);
    let height = ref(0);

    function addTemp(){
        temp.value += 10;
    }

    function addHeight(){
        height.value += 10;
    }

    watchEffect(() => {
        if(temp.value >= 60 || height.value >= 80){
            console.log("超出温度或者高度限制"); //addTemp 和 addHeight 激发监视
        }
    })
</script>
2.11 标签的ref属性
作用:用于注册模板引用
2.11.1 HTML标签的ref
在开发中防止不同模块中标签的id属性冲突,加入ref属性,不同模块中的相同ref属性只会在对应的模块中起作用,不会冲突
src/App.vue
<template>
    <h2 ref = "title2"> 你好</h2> //与Person的ref属性值相同
    <button @click="showLog">点我输出h2元素</button>
    <Person />
</template>

<script lang="ts" setup name = "App">
    import Person from './components/Person.vue'
    import { ref } from 'vue';

    let title2 = ref(); //变量名必须等于标签的ref属性值

    function showLog(){
        console.log(title2.value);
    }
</script>
src/components/Person.vue
<template>
    <div class="person">
        <h1>中国</h1>
        <h2 ref="title2">北京</h2> //与App的ref属性值相同
        <h3>尚硅谷</h3>
        <button @click="showLog">点我输出h2元素</button>
    </div>
</template>

<script lang="ts" setup name="Pseron">
    import { ref } from 'vue';

    let title2 = ref(); //变量名必须等于标签的ref属性值

    function showLog(){
        console.log(title2.value);
    }
</script>
效果如下:

注意
如果是相同id属性的话,则会导致只能输出第一个id的标签
2.11.1 组件标签的ref
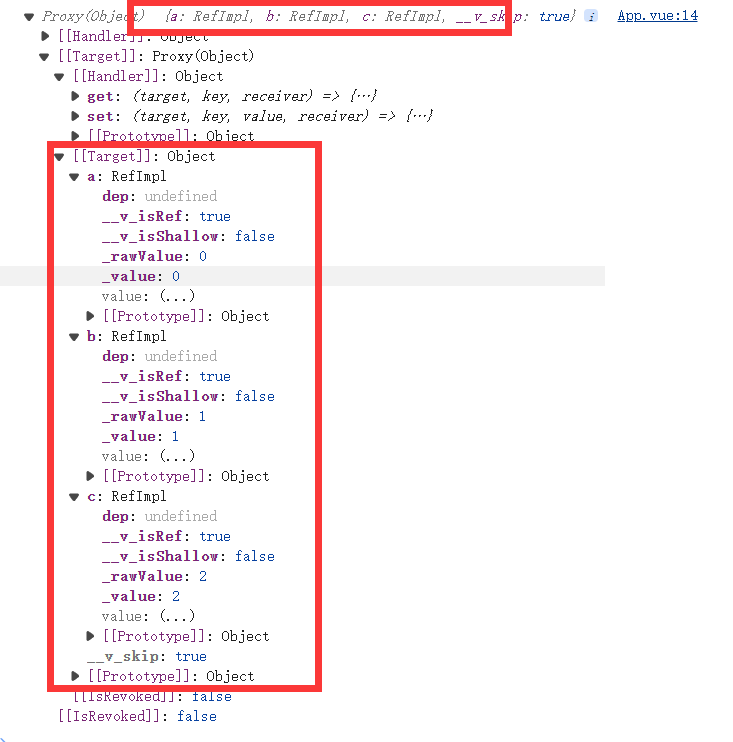
vue3中组件数据默认加密,当父组件查看子组件的数据时,必须经过子组件的
defineExpose函数暴漏
src/App.vue
<template>
    <h2 ref="title2"> 你好</h2>
    <button @click="showLog">测试</button>
    <Person ref="ren" />
</template>

<script lang="ts" setup name = "App">
    import Person from './components/Person.vue'
    import { ref } from 'vue';

    let ren = ref();

    function showLog(){
        console.log(ren.value);
    }
</script>
src/components/Person.vue
<script lang="ts" setup name="Pseron">
    import { ref , defineExpose } from 'vue';

    let title2 = ref()

    let a = ref(0)
    let b = ref(1)
    let c = ref(2)

    function showLog(){
        console.log(title2.value);
    }

    defineExpose({a,b,c})//将指定数据封装成对象暴漏出去
</script>
输出结果:
2.12 TS基础
2.12.1 接口
接口一般用来约束变量的结构内容,在vue项目中,经常放在src/types/index.ts中
//定于一个接口 并且暴漏出去
export interface PersonInter {
    id:string ,
    name:string ,
    age:number
}
定义完成后在模块中使用,src/comoponents/Person.vue
<script lang="ts" setup name="Pseron">
    import { type PersonInter } from '@/types' // @ 符号就是获取src的目录

    let person:PersonInter = {id:"asdasdasd",name:"LY_C",age:60};
</script>
2.12.2 泛型
泛型就是可以变化成任何类型的类型,常用 < > 包裹指定类型
<script lang="ts" setup name="Pseron">
    import { type PersonInter } from '@/types'

    let personList:Array<PersonInter> = [ //定义一个数组 该数组中的每一项都要符合PersonInter
        {id:"asdasdasd",name:"LY_C",age:60},
        {id:"asdasdasd1",name:"LY_C",age:60},
        {id:"asdasdasd2",name:"LY_C",age:60},
        {id:"asdasdasd3",name:"LY_C",age:60}
    ]
</script>
2.12.3 自定义类型
src/types/index.ts
//定于一个接口
export interface PersonInter {
    id:string ,
    name:string ,
    age:number
}

export type Persons = Array<PersonInter>
export type Persons = PersonInter[]//二选一都行
src/comoponents/Person.vue
<script lang="ts" setup name="Pseron">
    import { type Persons } from '@/types'

    let personList:Persons = [
        {id:"asdasdasd",name:"LY_C",age:60},
        {id:"asdasdasd1",name:"LY_C",age:60},
        {id:"asdasdasd2",name:"LY_C",age:60},
        {id:"asdasdasd3",name:"LY_C",age:60}
    ]

</script>
注意
只要是引入类型,都要在类型之前加入type关键字
2.13 标签 Props的使用
2.13.1 传递字符串
使用Props从父组件向子组件进行数据传递,父组件中直接在组件标签中加入数据
<template>
    <Person a="哈哈"/> //传递a='哈哈'
</template>

<script lang="ts" setup name = "App">
    import Person from './components/Person.vue'

</script>
子组件使用defineProps函数进行接收数据,可以直接在模板中使用
<template>
    <div class="person">
        <h2>{{a}}</h2>//哈哈
    </div>
</template>

<script lang="ts" setup name="Pseron">
    import { defineProps } from 'vue'

    defineProps(['a'])//必须写成数组的形式

</script>
defineProps函数返回值是一个对象,直接获取对象的属性即可对传输的数据进行操作
<template>
    <div class="person">
        <h2>{{a}}</h2>
    </div>
</template>

<script lang="ts" setup name="Pseron">
    import { defineProps } from 'vue'

    let x = defineProps(['a']) // x = { a : "哈哈" }
    console.log(x.a);
</script>
2.13.2 解析传递数据
使用冒号解析传递,:变量名 = "表达式" 执行表达式并传递
父标签
<template>
    <Person :list="personList"/> // 解析传递 传递的是内容 list = personList数组
</template>

<script lang="ts" setup name = "App">
    import Person from './components/Person.vue'
    import { reactive } from 'vue'
    import { type Persons } from '@/types'

    let personList = reactive<Persons>([
        {id:"asd1",name:"张三",age:21},
        {id:"asd2",name:"李四",age:22},
        {id:"asd3",name:"王五",age:21}
    ])
</script>
子标签
<template>
    <div class="person">
        <ul>
            <li v-for="personObj in list" :key="personObj.id" >
                {{personObj.name}} - {{personObj.age}}
            </li>
        </ul>
    </div>
</template>

<script lang="ts" setup name="Pseron">
    import { defineProps } from 'vue'

    defineProps(['list'])// 接收list
</script>
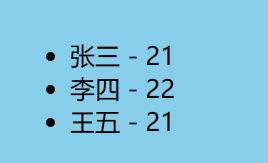
效果展示
2.13.3 限制接收数据
子模块直接使用defineProps的泛型参数限制,传递的类型
<template>
    <div class="person">
        <ul>
            <li v-for="personObj in list" :key="personObj.id" >
                {{personObj.name}} - {{personObj.age}}
            </li>
        </ul>
    </div>
</template>

<script lang="ts" setup name="Pseron">
    import { defineProps } from 'vue'
    import { type Persons } from '@/types'
    defineProps<{list:Persons}>()//只能接收类型是Peosons的数据
</script>
2.13.4 限制必要性指定默认值
使用?指定传递的数据可有可无,使用withDefaults函数进行指定默认值,由于defineProps返回的是一个对象,所以默认值需要指定成一个对象
子模块
<template>
    <div class="person">
        <ul>
            <li v-for="personObj in list" :key="personObj.id" >
                {{personObj.name}} - {{personObj.age}}
            </li>
        </ul>
    </div>
</template>

<script lang="ts" setup name="Pseron">
    import { defineProps , withDefaults } from 'vue'
    import { type Persons } from '@/types'

    withDefaults(defineProps<{list?:Persons}>(),{
        list:[{id:"asd1",name:"LY_C",age:22}]
    })
</script>
父模块
<template>
    <Person /> //无传递 无报错
</template>

<script lang="ts" setup name = "App">
    import Person from './components/Person.vue'

</script>
效果展示

2.14 生命周期
组件生命周期:创建、挂载、更新、销毁
2.14.1 vue2生命周期
vue2项目创建及运行
安装vue脚手架
npm install -g @vue/cli
npm i webpack webpack-cli -D
创建vue2项目,选择vue2版本即可
vue create vue2_test
启动项目
npm run serve
在vue中添加/* eslint-disable */ 关闭语法检查
生命周期 分为四个阶段 八个关键函数(又名勾子)
创建(创建前
beforeCreate(),创建完毕created())挂载(挂载前
beforeMount(),挂载完毕mounted())更新(更新
beforeUpdate(),更新完毕updeted())销毁 (销毁前
beforeDestroy(),销毁完毕destroyed())
<script>
/* eslint-disable */
export default {
  name: 'Person',
  data(){
    return {
        sum:1
    }
  },
  methods:{
    addSum(){
        this.sum+=1;
    }
  },
  beforeCreate(){
    console.log("创建前");
  },
  created(){
    console.log("创建完毕");
  },mounted(){
    console.log("挂载完毕");
  },beforeMount(){
    console.log("挂载前");
},beforeUpdate(){
    console.log("更新前");
},updated(){
    console.log("更新完毕");
},destroyed(){
    debugger;
    console.log("销毁前");
},beforeDestroy(){
    console.log("销毁完毕");
  }
}
</script>
2.14.2 vue3生命周期
生命周期 分为四个阶段 六个关键函数(又名勾子) vue3中的钩子函数 必须从vue导入
vue3中使用setop函数进行 创建
挂载(挂载前
onBeforeMount(),挂载完毕onMounted())更新(更新
onBeforeUpdate(),更新完毕onUpdeted())卸载(卸载前
onBeforeUnmount(),卸载完毕onUnmounted())
<script lang="ts" setup name="Pseron">
    import { ListFormat } from 'typescript';
    import { ref , onBeforeMount , onMounted , onBeforeUpdate ,onUpdated ,onBeforeUnmount ,onUnmounted } from 'vue'
    let sum = ref(0)
    function addSum(){
        sum.value += 1;
    }
    console.log("创建");

    onBeforeMount(() => {
        console.log("挂载前");
    })

    onMounted(() => {
        console.log("挂载完毕");
    })

    onBeforeUpdate(() => {
        console.log("更新之前");
    })

    onUpdated(() => {
        console.log("更新完毕");

    })

    onBeforeUnmount(() => {
        console.log("卸载前");
    })

    onMounted( () => {
        console.log("卸载完毕");
    } )
</script>
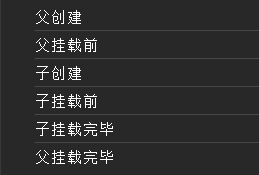
解析流程:
父模块为App.vue 子模块为Person.vue
-
index.html读取到<script type="module" src="/src/main.ts"></script> -
`src/main.ts读到import App from "./App.vue" -
src/App.vue按照顺序执行setup()、onBeforeMount()读到import Person from './components/Person.vue' -
src/components/Person.vue按照顺序执行setup()、onBeforeMount()、onBeforeUnmount()、onUnmounted()子模块渲染完毕 回到父模块 -
src/App.vue继续执行onMounted()父模块渲染完毕 -
挂载到
index.html中的<div id="app"></div>
常用钩子:onMounted()、onUpdated()、onBeforeUnmont()
2.15 自定义Hooks
hook函数用于将数据和函数绑定到一块,常写到src/hooks/useXxx.ts 规范必须有返回数据和方法
src/hooks/useSum.ts
import { ref } from 'vue'

export default function (){
    let sum = ref(0)

    function add(){
        sum.value +=1 ;
    }

    return {sum,add}
}
src/hooks/useDog.ts
import { reactive } from 'vue'
import axios from 'axios'

export default function (){
    let dogList = reactive([
        'https://images.dog.ceo/breeds/pembroke/n02113023_1496.jpg'
    ])

    async function getDog(){
        try {
            let result = await axios.get('https://dog.ceo/api/breed/pembroke/images/random')
            dogList.push(result.data.message)
        } catch (error) {
            alert(error)
        }
    }

    return {dogList,getDog}
}
src/components/Person.vue
<template>
    <div class="person">
        <h2>当前求和为:{{sum}}</h2>
        <button @click="add">sum+1</button>
        <hr >
        <img v-for="(dog ,index) in dogList" :src="dog" :key = "index" >
        <br >
        <button @click="getDog">再来一只狗</button>
    </div>
</template>

<script lang="ts" setup name="Pseron">
    import useSum from '@/hooks/useSum'
    import useDog from '@/hooks/useDog'

    const {sum,add} = useSum()
    const {dogList,getDog} = useDog()
</script>
2.16 路由
路由是一组key-value的对应关系,多个路由,需要经过路由器的管理
npm i vue-router
在src/router/index.ts中编写route规则,其中createRouter函数中需要传递对象,history属性对应模式,routes对应路由规则
routes应该赋予对象数组,每个对象都对应着路径和组件
import { createRouter , createWebHistory } from 'vue-router'

import Home from '@/components/Home.vue'
import News from '@/components/News.vue'
import About from '@/components/About.vue'

const router = createRouter({
    history:createWebHistory(),//路由器工作模式
    routes:[ //路由规则
        {
            path:'/home',
            component:Home
        },
        {
            path:'/news',
            component:News
        },
        {
            path:'/about',
            component:About
        }
    ]
})
//暴漏出去
export default router
在main.ts中启用路由,要在挂载之前启用路由
import { createApp } from "vue"

import App  from "./App.vue"
//导入路由
import router from "./router"
//创建一个App
const app = createApp(App)
//使用路由
app.use(router)
//挂载路由
app.mount("#app")
在main.index中使用RouterView,RouterLink,其中RouterView对应的是路由规则中component占位符,RouterLink就是给路由传递link参数。
to参数传递给路由link数据,路由解析link数据找到对应的componet,将对应的componet解析到<RouterView></RouterView>位置
<template>
    <div class="app">
        <h2 class="title">Vue路由测试</h2>

        <div class="navigate">
            <RouterLink to="/home" active-class="active">首页</RouterLink>
            <RouterLink to="/news" active-class="active">新闻</RouterLink>
            <RouterLink to="/about" active-class="active">关于</RouterLink>
        </div>

        <div class="main-content">
            <RouterView></RouterView>
        </div>
    </div>
</template>

<script lang="ts" setup name = "App">
    import {RouterView,RouterLink} from 'vue-router'

</script>
使用RouterView显示的的模块,显示时执行setup、onMonuted钩子,切换到别的组件时将执行onUnmounted钩子
路由组件长放在src/router
2.16.1 路由器的工作模式
分为history和hash两种工作模式
history模式
优点:URL更加美观,不带有
#,更接近传统网站URL缺点:后期项目上线,需要服务器配合处理路径问题
const router = createRouter({
    history:createWebHistory(),//路由器工作模式
    routes:[//路由规则

    ]
})
hash函数
优点:兼容性好,因为不需要服务器端处理路径
缺点:
URL带有#不太美观,且在SEO方面优化相对较差
const router = createRouter({
    history:createWebHashHistory(),//路由器工作模式
    routes:[//路由规则

    ]
})
2.16.2 RouterLink 的 to
RouterLink标签种to参数有两种写法,一种是直接写路径,另外一种是写对象
<div class="navigate">
	<RouterLink to="/home" active-class="active">首页</RouterLink>
	<RouterLink :to="{path:'/news'}" active-class="active">新闻</RouterLink>
</div>
2.16.3 route命名
直接在路由规则中添加name属性即可对路由进行命名
const router = createRouter({
    history:createWebHistory(),//路由器工作模式
    routes:[//路由规则
        {
            name:'homeRoute',
            path:'/home',
            component:Home
        },
        {
            name:'newsRoute',
            path:'/news',
            component:News
        },
        {
            name:'aboutRoute',
            path:'/about',
            component:About
        }
    ]
})
在RouterLink中也可以使用name属性进行跳转
<div class="navigate">
	<RouterLink to="/home" active-class="active">首页</RouterLink>
	<RouterLink :to="{name:'newsRoute'}" active-class="active">新闻</RouterLink>
	<RouterLink :to="{path:'/about'}" active-class="active">关于</RouterLink>
</div>
2.16.4 多级路由
路由中添加children属性
const router = createRouter({
    history:createWebHistory(),//路由器工作模式
    routes:[//路由规则
        {
            name:'homeRoute',
            path:'/home',
            component:Home
        },
        {
            name:'newsRoute',
            path:'/news',
            component:News,
            children:[
                {
                    name:'newsDetail',
                    path:'detail',
                    component:NewsContent
                }
            ]
        },
        {
            name:'aboutRoute',
            path:'/about',
            component:About
        }
    ]
})
在routerLink中to属性要写完整路由即包括父路由
<template>
    <div class="news">
      <ul>
        <li v-for='news in newsList' :key='news.id'>
          <RouterLink to="/news/detail">{{news.title}}</RouterLink>
        </li>
      </ul>
      <div class="news-content">
        <RouterView></RouterView>
      </div>
    </div>
  </template>
2.16.5 路由的传参
2.16.5.1 路由的query传参
组件使用RouterLink向路由组件传递参数,路由组件使用useRoute函数接收对象再使用query属性
路由
const router = createRouter({
    history:createWebHistory(),//路由器工作模式
    routes:[//路由规则
        {
            name:'homeRoute',
            path:'/home',
            component:Home
        },
        {
            name:'newsRoute',
            path:'/news',
            component:News,
            children:[
                {
                    name:'newsDetail',
                    path:'detail',
                    component:NewsContent
                }
            ]
        },
        {
            name:'aboutRoute',
            path:'/about',
            component:About
        }
    ]
})
组件
使用
RouterLink传递参数时要用&分割参数 如下是使用路径方式传递
<template>
    <div class="news">
      <ul>
        <li v-for='news in newsList' :key='news.id'>
          <RouterLink :to="`/news/detail?id=${news.id}&title=${news.title}&content=${news.content}`">{{news.title}}</RouterLink>
        </li>
      </ul>
      <div class="news-content">
        <RouterView></RouterView>
      </div>
    </div>
  </template>

  <script setup lang="ts" name="News">
      import { reactive  } from 'vue'

      const newsList = reactive([
        {id:'asd1',title:'一种抗癌食物',content:'西兰花'},
        {id:'asd2',title:'如何一夜暴富',content:'学it'},
        {id:'asd3',title:'震惊万万没想到',content:'明天是周一'},
        {id:'asd4',title:'好消息!好消息!',content:'快放假了'}
      ])
  </script>
路由组件
<template>
    <ul class="news-list">
        <li>编号:{{ route.query.id }}</li>
        <li>标题:{{ route.query.title }}</li>
        <li>内容:{{ route.query.content }}</li>
    </ul>
</template>

<script setup lang="ts" name="About">
    import { useRoute } from 'vue-router'
    const route = useRoute()
</script>
route对象的结构如下图
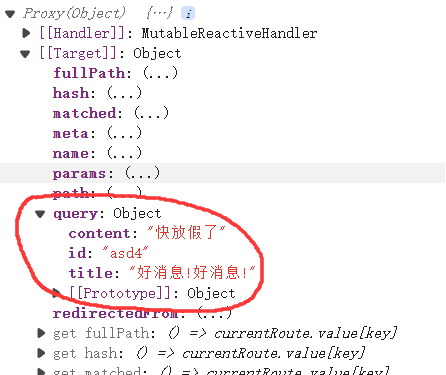
使用对象方式传递query:
<template>
    <div class="news">
      <ul>
        <li v-for='news in newsList' :key='news.id'>
          <RouterLink
            :to="{
              path:'/news/detail',
              query:{
                id:news.id,
                title:news.title,
                content:news.content
              }}"
          >
            {{news.title}}
          </RouterLink>
        </li>
      </ul>
      <div class="news-content">
        <RouterView></RouterView>
      </div>
    </div>
  </template>
2.16.5.2 路由的params传参
在使用params传参数时必须将路由规则中添加对应的占位符,其中占位符的变量名必须与从模块的参数名一致
路由
const router = createRouter({
    history:createWebHistory(),//路由器工作模式
    routes:[//路由规则
        {
            name:'homeRoute',
            path:'/home',
            component:Home
        },
        {
            name:'newsRoute',
            path:'/news',
            component:News,
            children:[
                {
                    name:'newsDetail',
                    path:'detail/:id/:title/:content',// 使用 `/:xxx` 方式
                    component:NewsContent
                }
            ]
        },
        {
            name:'aboutRoute',
            path:'/about',
            component:About
        }
    ]
})
组件向路由组件使用RouterLink传递参数,路由组件使用useRoute函数接收对象再使用params属性
主组件
  <div class="news">
    <ul>
      <li v-for='news in newsList' :key='news.id'>
        <RouterLink :to="`/news/detail/${news.id}/${news.title}/${news.content}`"> //格式化变量顺序必须和规则中的一致
            {{news.title}}
        </RouterLink>
      </li>
    </ul>
    <div class="news-content">
      <RouterView></RouterView>
    </div>
  </div>
</template>
从组件
<template>
    <ul class="news-list">
        <li>编号:{{ params.id }}</li> //格式化变量名必须和规则中的一致
        <li>标题:{{ params.title }}</li>
        <li>内容:{{ params.content }}</li>
    </ul>
</template>

<script setup lang="ts" name="About">
    import { toRefs } from 'vue'
    import { useRoute  } from 'vue-router';
    const {params} = toRefs(useRoute())
    // console.log(params.value);
</script>
使用对象方式传递params,必须使用对象传递的方式{ name : xxx }:
<template>
  <div class="news">
    <ul>
      <li v-for='news in newsList' :key='news.id'>
        <RouterLink :to="{
        	name: 'newsDetail',
        	params: {
          		id: news.id,
          		title: news.title,
          		content: news.content
        	}
      	}">
          {{ news.title }}
        </RouterLink>
      </li>
    </ul>
    <div class="news-content">
      <RouterView></RouterView>
    </div>
  </div>
</template>
注意:在路由规则中使用/:xxx?,已到达该变量可不赋值的目的,否则必须将变量赋值
const router = createRouter({
    history:createWebHistory(),//路由器工作模式
    routes:[//路由规则
        {
            name:'homeRoute',
            path:'/home',
            component:Home
        },
        {
            name:'newsRoute',
            path:'/news',
            component:News,
            children:[
                {
                    name:'newsDetail',
                    path:'detail/:id/:title/:content?:',// content 使用 `/:xxx?` 方式 可以不传递 content
                    component:NewsContent
                }
            ]
        },
        {
            name:'aboutRoute',
            path:'/about',
            component:About
        }
    ]
})
2.16.6 路由的Prop配置
使用Prop配置大大简化路由组件的代码,路由组件使用defineProps接收即可
方法一
在路由中开启prop选项,将params转为prop,路由组件中使用defineProps接收
路由
const router = createRouter({
    history:createWebHistory(),//路由器工作模式
    routes:[//路由规则
        {
            name:'homeRoute',
            path:'/home',
            component:Home
        },
        {
            name:'newsRoute',
            path:'/news',
            component:News,
            children:[
                {
                    name:'newsDetail',
                    path:'detail/:id/:title/:content',// params 方式
                    component:NewsContent,
                    props:true
                }
            ]
        },
        {
            name:'aboutRoute',
            path:'/about',
            component:About
        }
    ]
})
组件
<template>
  <div class="news">
    <ul>
      <li v-for='news in newsList' :key='news.id'>
        <RouterLink :to="{
          name: 'newsDetail',
          params: {  // 使用params
            id: news.id,
            title: news.title,
            content: news.content
          }
        }">
          {{ news.title }}
        </RouterLink>
      </li>
    </ul>
    <div class="news-content">
      <RouterView></RouterView>
    </div>
  </div>
</template>
路由组件
<template>
    <ul class="news-list">
        <li>编号:{{ id }}</li>
        <li>标题:{{ title }}</li>
        <li>内容:{{ content }}</li>
    </ul>
</template>

<script setup lang="ts" name="About">
    defineProps(['id','title','content'])
</script>
方法二
在路由中直接使用prop函数返回query,将query转为prop ;路由组件中使用defineProps接收。 prop函数中的参数就是整个路由,所以返回参数名.query即可
路由
const router = createRouter({
    history:createWebHistory(),//路由器工作模式
    routes:[//路由规则
        {
            name:'homeRoute',
            path:'/home',
            component:Home
        },
        {
            name:'newsRoute',
            path:'/news',
            component:News,
            children:[
                {
                    name:'newsDetail',
                    path:'detail',
                    component:NewsContent,
                    props(route){
                        return route.query
                    }
                }
            ]
        },
        {
            name:'aboutRoute',
            path:'/about',
            component:About
        }
    ]
})
组件
<template>
  <div class="news">
    <ul>
      <li v-for='news in newsList' :key='news.id'>
        <!-- <RouterLink
            :to="`/news/detail/${news.id}/${news.title}/${news.content}`"
          >
            {{news.title}}
          </RouterLink>           -->
        <RouterLink :to="{
          name: 'newsDetail',
          query: { // query 方式
            id: news.id,
            title: news.title,
            content: news.content
          }
        }">
          {{ news.title }}
        </RouterLink>
      </li>
    </ul>
    <div class="news-content">
      <RouterView></RouterView>
    </div>
  </div>
</template>
路由组件和方法一相同
方法三
路由使用prop参数传递对象,参数固定不常用
const router = createRouter({
    history:createWebHistory(),//路由器工作模式
    routes:[//路由规则
        {
            name:'homeRoute',
            path:'/home',
            component:Home
        },
        {
            name:'newsRoute',
            path:'/news',
            component:News,
            children:[
                {
                    name:'newsDetail',
                    path:'detail',
                    component:NewsContent,
                    props:{//参数固定
                    	a:100,
                    	b:200,
                    	c:300
                    }
                }
            ]
        },
        {
            name:'aboutRoute',
            path:'/about',
            component:About
        }
    ]
})
路由组件和方法一相同
2.16.7 路由的replace属性
路由有两种模式,一个是Push,另一个是replace ,默认为push模式即栈模式,replace模式就是替换模式直接进行页面替换。浏览器的返回箭头即是push模式的栈指针在上下移动
在组件的RouterLink 标签种使用 repalce 关键字即可开启replace
开启replace之后将无法使用浏览器的返回箭头
<template>
    <div class="app">
        <Header />
        <div class="navigate">
            <RouterLink replace to="/home" active-class="active">首页</RouterLink> //开启replace
            <RouterLink replace :to="{name:'newsRoute'}" active-class="active">新闻</RouterLink>
            <RouterLink replace :to="{path:'/about'}" active-class="active">关于</RouterLink>
        </div>

        <div class="main-content">
            <RouterView></RouterView>
        </div>
    </div>
</template>
2.16.8 编程式导航
使用代码实现路由跳转,而不是使用RouterLink标签,组件使用useRouter函数获取到整个路由的管理者,在通过push方法或者replace方法跳转到特定的路由
  <script setup lang="ts" name="Home">
    import { onMounted } from 'vue'
    import { useRouter } from 'vue-router'

    const router = useRouter()

    onMounted(() => {
      setTimeout(() =>{
        router.push('/news') //在页面三秒后自动跳转到/news路由
      },3000)
    })
</script>
push和replace的传参方式和 RouterLinlk 的 to属性一致 ,都可传递字符串和对象
<script setup lang="ts" name="News">
import { reactive } from 'vue'
import { useRouter } from 'vue-router'
const newsList = reactive([
  { id: 'asd1', title: '一种抗癌食物', content: '西兰花' },
  { id: 'asd2', title: '如何一夜暴富', content: '学it' },
  { id: 'asd3', title: '震惊万万没想到', content: '明天是周一' },
  { id: 'asd4', title: '好消息!好消息!', content: '快放假了' },
  { id: 'asd5', title: '测试!', content: '快放假了',other:"12345" },
])

const rouetr = useRouter()

interface NewsInter{
  id:string,
  title:string,
  content:string
}

function showNewsDetali(news:NewsInter){
  rouetr.push({
    name: 'newsDetail',
    query: {
      id: news.id,
      title: news.title,
      content: news.content
    }
  })
}

</script>
注意
路由的配置需要和push传参的属性一致
2.16.9 路由重定向
将指定路径重新定位到另一个路径,在路由中使用redirect属性指定重定向的位置
const router = createRouter({
    history:createWebHistory(),//路由器工作模式
    routes:[//路由规则
        {
            name:'homeRoute',
            path:'/home',
            component:Home
        },{
            path:'/',
            redirect:'/home' // http://localhost:5173/ ===>  http://localhost:5173/home
        }
    ]
})
2.17 Pinia集中式状态管理
用于解决多个组件共享数据
2.17.1 搭建pinia环境
终端执行
npm i pinia
在main.ts中
import { createApp } from "vue"
import App  from "./App.vue"
// 引入Pinia
import { createPinia } from 'pinia'
const app = createApp(App)

// 创建Pinia
const pinia = createPinia()
// 安装Pinia
app.use(pinia)

app.mount("#app")
2.17.2 pinia存储 读取
store为pinia的实现 命名方式为useXxxxStore和hook命名相同
在src/store/下创建和需要共享组件名一样的ts文件,该文件相当于是数据仓库,src/store/count.ts defineStore中第一个参数为store名,第二个参数为数据对象,返回数据使用的是state函数
import { defineStore } from 'pinia'

export const useCountStore = defineStore('conut',{
    state(){
        return {
            sum:6
        }
    }
})
在对应组件中使用已经定义好的store,src/Count.vue
<template>
  <div class = 'count'>
    <h2>当前求个为:{{ countStore.sum }}</h2>
    <select v-model.number="n">
        <option value="1">1</option>
        <option value="2">2</option>
        <option value="3">3</option>
    </select>
    <button @click="add">加</button>
    <button @click="minus">减</button>
  </div>
</template>

<script setup lang='ts' name='Count'>
    import { ref } from 'vue'
    import { useCountStore } from '@/store/count' // 引入已经创建好的 store

    const countStore = useCountStore()// 获取到 store对象
</script>
注意
虽然ref类型的变量需要修改时要调用value属性,但是被reactive包裹时会自动解析ref,所以不用调用value属性
let test = reactive({
	a:100,
	b:ref(0)
})
consle.log(test.b) // 0
2.17.3 修改数据的三种方式
方法一 直接修改
直接使用对应组件store中的相关数据属性
<script setup lang='ts' name='Count'>
    import { ref } from 'vue'
    import { useCountStore } from '@/store/count' // 引入已经创建好的 store

    const countStore = useCountStore()// 获取到 store对象

    let n = ref(1)

    function add(){
        countStore.sum += n.value
    }

    function minus(){
        countStore.sum -= n.value
    }
</script>
方法二$patch批量变更
使用pinia中的$patch实现批量变更,常用于多数据修改
store
import { defineStore } from 'pinia'

export const useCountStore = defineStore('conut',{
    state(){
        return {
            sum:6,
            address:'北京',
            name:"张三"
        }
    }
})
组件
countStore.$patch({
	sum:888,
	address:'上海',
	name:"LY_C"
})
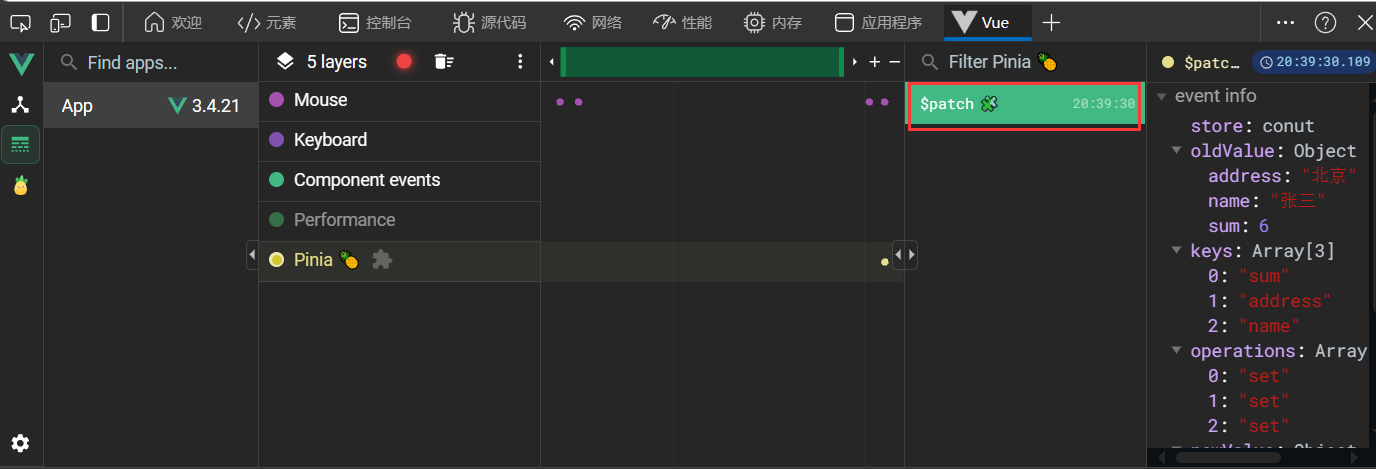
方法一和方法二的区别
在时间线中,每修改一个store中的相关数据属性,即触发一次
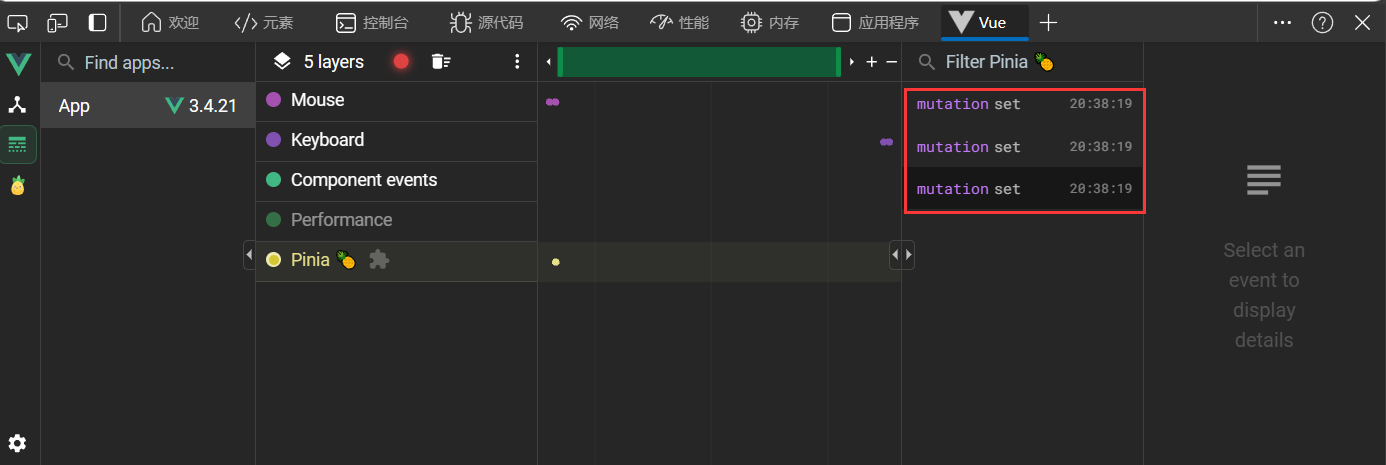
而使用$patch函数不管修改几个属性只触发一次
方法三 动作方法
在store中配置使用actions属性,此属性中放置的都是动作方法,用于响应组件中的”动作”,多数用于处理逻辑并保持代码清爽使用
store
import { defineStore } from 'pinia'

export const useCountStore = defineStore('conut',{
    actions:{
        increment(value:number){ // 自定义函数
            if( value <= 10 ){
                this.sum += value // this 就是 store (useCountStore)
            }
        },
        sinus(value:number){
            this.sum -= value
        }
    },
    state(){
        return {
            sum:6,
            address:'北京',
            name:"张三"
        }
    }
})
组件
<script setup lang='ts' name='Count'>
    import { ref } from 'vue'
    import { useCountStore } from '@/store/count'

    const countStore = useCountStore()

    let n = ref(1)

    function add(){
        countStore.increment(n.value) //直接调用函数
    }

    function minus(){
        countStore.sinus(n.value)
    }
</script>
2.17.4 store解构赋值
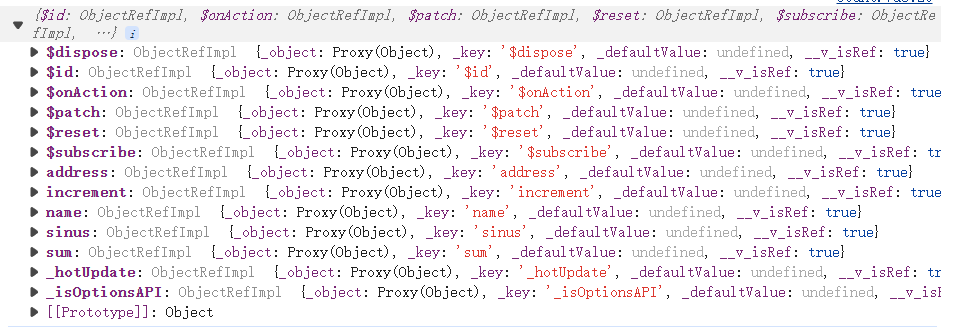
为了完成数据属性的解构赋值,并且保证store的响应式,可以使用toRefs和storeToRefs,推荐使用storeToRefs,因为storeToRefs只会将store中的数据属性转为ref
toRef 结构

storeToRefs
模块
<script setup lang='ts' name='Count'>
    import { ref  , toRefs} from 'vue'
    import { useCountStore } from '@/store/count'
    import { storeToRefs } from 'pinia'
    const countStore = useCountStore() // 获取该模块的pinia实例
    let {sum} = storeToRefs(countStore) // 使用 storeToRefs 解构
</script>
2.17.5 getter函数
pinia中的getter对象用于加工返回数值,直接在store中,在getter对象写入自定义函数即可
import { defineStore } from 'pinia'

export const useCountStore = defineStore('conut',{
    actions:{
        increment(value:number){
            this.sum += value
        },
        sinus(value:number){
            this.sum -= value
        }
    },
    state(){
        return {
            sum:1,
            address:'北京',
            name:"张三"
        }
    },getters:{
        bigSum(state){ // 函数参数 state
            return state.sum * 10
        }
    }
})
2.17.6 监视store数据
直接使用store中的$subscribe函数直接监视数据变化,该函数有两个参数mutate和state,其中state是改变后的store,可用来将数据保存到浏览器,以达到刷新不丢失的目的
store
import { defineStore } from 'pinia'
import axios from 'axios'
import { nanoid } from 'nanoid'

export const usrLoveStore = defineStore('love',{
    actions:{
        async getATalk(){
            let {data:{content:title}} = await axios.get('https://api.uomg.com/api/rand/qinghau?format=json')
            let obj = {
                id:nanoid(),
                title
            }
            this.talkList.unshift(obj)
        }
    },
    state(){
        return {
            talkList:JSON.parse(localStorage.getItem('talkList') as string) || [] //以JSON方式将本地存储的数据拿出
        }
    }
})
模块
<script setup lang='ts' name='LoveTalk'>
    import { usrLoveStore } from '@/store/love'
    import { storeToRefs } from 'pinia'

    const LoveStore = usrLoveStore()

    LoveStore.$subscribe((mutate,state) => {
        localStorage.setItem('talkList',JSON.stringify(state.talkList)) //将特定数据存储到浏览器本地
    })

</script>
数据浏览
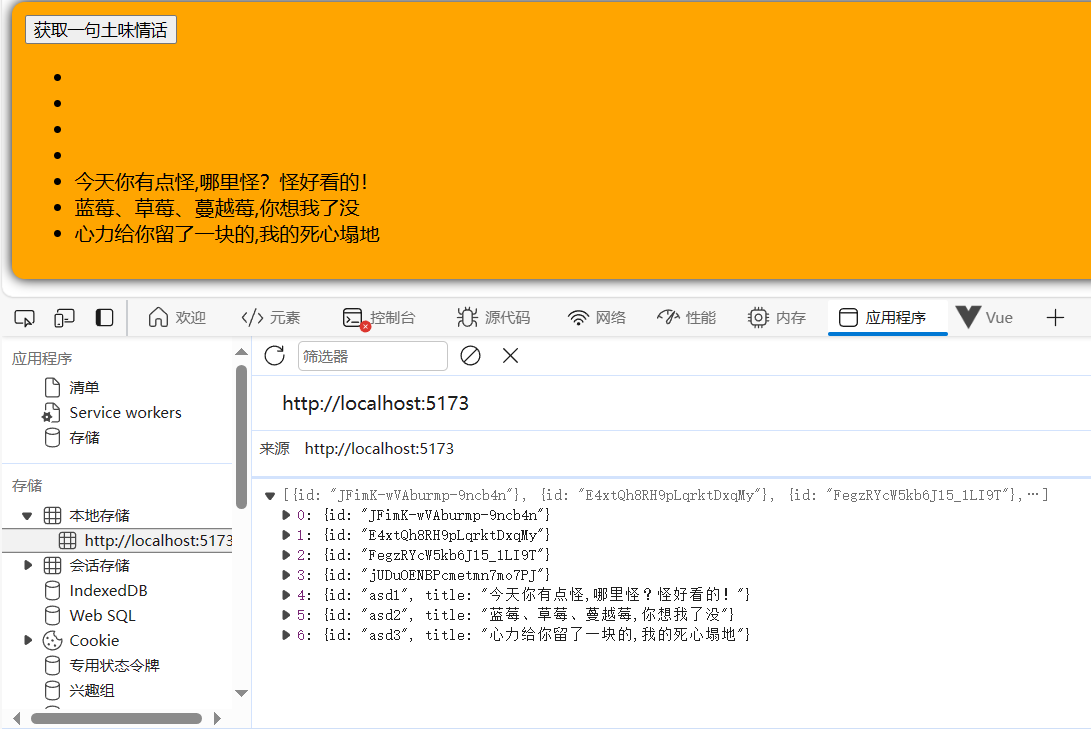
2.17.7 store的组合式写法
该写法有些类似于将vue2的语法转为vue3,第一个参数为store的名字,第二个为一个函数类似于vue3中的setup,需要返回数据和方法
import { reactive } from 'vue'

export const usrLoveStore = defineStore('love',() => {
    const talkList = reactive(JSON.parse(localStorage.getItem('talkList') as string) || [])

    async function getATalk(){
        let {data:{content:title}} = await axios.get('https://api.uomg.com/api/rand/qinghau?format=json')
        let obj = {
            id:nanoid(),
            title
        }
        talkList.unshift(obj)
    }

    return {talkList,getATalk}
})
2.18 组件之间的通讯
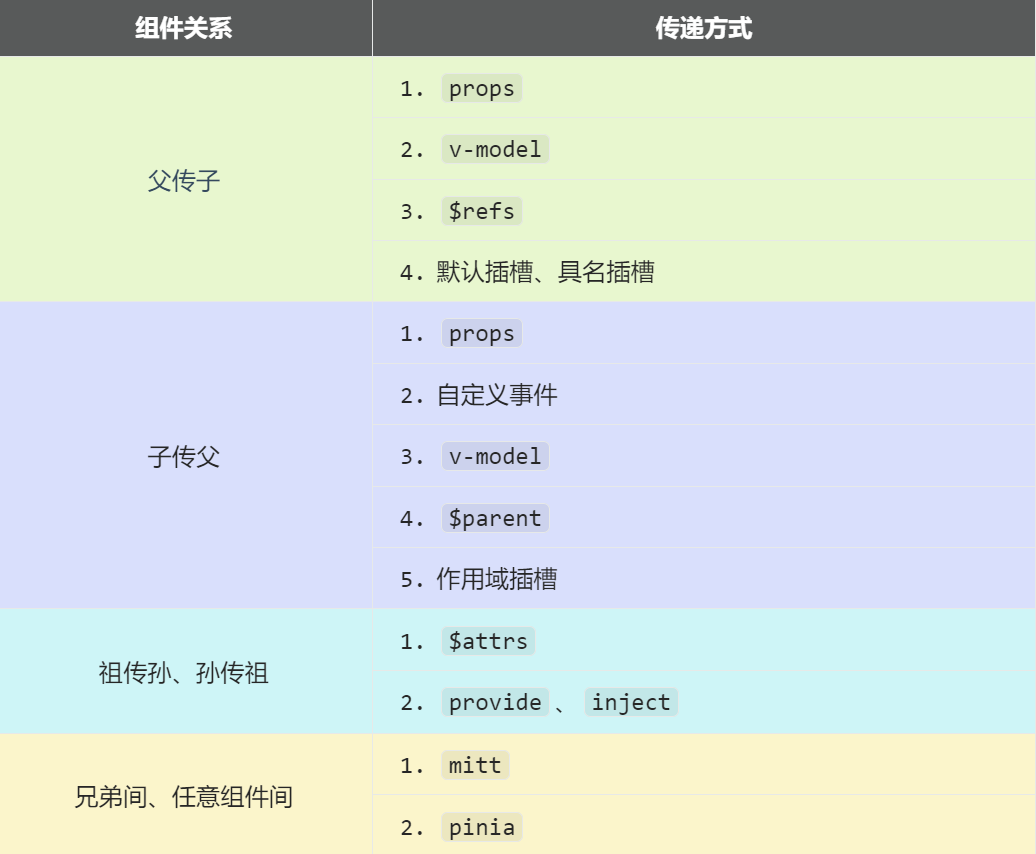
方法一 Props
使用Props传输,父传子传输的是非函数,子传父使用的是函数。
父组件
<template>
  <div class="father">
    <h3>父组件</h3>
	<h4>汽车{{ car }}</h4>
	<h4 v-if="toy" >子给的{{ toy }}</h4>
	<Child :car="car" :sendToy="getToy"/> // 发送数值和函数给Child car="car" sendToy="getToy"
  </div>
</template>

<script setup lang="ts" name="Father">
	import Child from './Child.vue'
	import { ref } from 'vue'

	let car = ref('XiaoMI')
	let toy = ref('')
	function getToy(value:string){
		toy.value = value
	}
</script>
子组件
<template>
  <div class="child">
    <h3>子组件</h3>
	<h4>玩具:{{ toy }}</h4>
	<h4>爹给的车:{{ car }}</h4>
	<button @click="sendToy(toy)" >把玩具给父亲</button> // 直接调用父组件传输的函数实现子传父
  </div>
</template>

<script setup lang="ts" name="Child">
	import {ref , defineProps } from 'vue'

	let toy = ref('奥特曼')

	defineProps(['car','sendToy'])//接收数据
</script>
方法二 自定义事件
自定义事件声明于子组件 触发函数声明于父组件 子组件触发事件并发送数据
自定义事件使用于子传父,首先使用在父组件中使用@自定义事件名=自定义函数名的格式将子组件绑定一个自定义事件,然后在子组件中使用defineEmits声明一个同名事件,在父组件中编写自定义函数用于触发;使用变量接收defineEmits()整个事件对象,最后在标签中调用事件并传输数据
父组件中使用
@自定义事件名=自定义函数名
<template>
  <div class="father">
    <h3>父组件</h3>

    <Child @abc="xyz" /> //自定义事件abc
  </div>
</template>
子组件中使用
defineEmits声明一个同名事件
<script setup lang="ts" name="Child">
	import { ref  } from 'vue'
	let toy = ref('奥特曼')
	defineEmits(['abc'])
</script>
在父组件中编写自定义函数用于触发
<script setup lang="ts" name="Father">
  	import Child from './Child.vue'

	function xyz(value:number){
		console.log('xyz',value);
	}
</script>
变量接收
defineEmits()整个事件对象
<template>
  <div class="child">
    <h3>子组件</h3>
	<h4>玩具{{ toy  }}</h4>
	<button @click="emit('abc',666)" >点我发送</button> //第一个参数为触发的事件名,第二个是传输的数据
  </div>
</template>

<script setup lang="ts" name="Child">
	import { ref } from 'vue'
	let toy = ref('奥特曼')
	const emit = defineEmits(['abc'])
</script>
方法三 mitt
mitt可以实现任意组件之间通讯
发送数据方触发事件 接收数据方绑定事件
emitter是mitt的实例化,emitter能 绑定事件 触发事件,一般会将工具都放到src/utils中
import mitt from 'mitt'
// 调用mitt得到emitter emitter能 绑定事件 触发事件
const emitter =  mitt()
// 暴漏emitter
export default emitter
emitter中有四个属性,分别是all(显示所有事件)、emit(触发某个事件)、off(解绑某个事件)、on (绑定某个事件)
模块发送方
<template>
  <div class="child1">
    <h3>子组件1</h3>
	<h4>玩具{{ toy }}</h4>
	<button @click="emitter.emit('send-toy',toy)">给弟弟玩具</button> //触发事件并传值
  </div>
</template>

<script setup lang="ts" name="Child1">
	import { ref } from 'vue'
	import emitter from "@/utils/emitter"

	let toy = ref("奥特曼")

</script>
模块接收方
<template>
  <div class="child2">
    <h3>子组件2</h3>
	<h4>电脑{{ computer }}</h4>
	<h4 v-if="toy" >弟弟给的玩具{{ toy }}</h4>
  </div>
</template>

<script setup lang="ts" name="Child2">
	import { ref , onUnmounted } from 'vue'
	import emitter from '@/utils/emitter'
	let computer = ref("联想")
	let toy = ref('')

	emitter.on('send-toy',(value:any)=>{ //绑定事件
		toy.value = value
	})

	onUnmounted(() => { //卸载时解绑事件
		emitter.off('send-toy')
	})
</script>
方法四 v-model
普通html标签使用v-model,实现双向绑定,实现原理就是动态value和input事件
<template>
  <div class="father">
    <h3>父组件</h3>
    <input type="text" v-model="username">
    <input type="text" :value="username" @input="username = $event.target.value" >
  </div>
</template>

<script setup lang="ts" name="Father">
  import { ref } from 'vue'
  let username = ref('张三')

</script>
组件使用v-model属性,子组件默认接收的属性为modelValue和update:modelValue,原理是使用Pops传递给子模块数据 使用自定义事件子模块给父模块传递数据
父组件
<template>
  <div class="father">
    <h3>父组件</h3>
    <!-- <input type="text" v-model="username"> -->
    <!-- <input type="text" :value="username" @input="username = (<HTMLInputElement>$event.target).value" > -->

    <AtguiguInput v-model="username" />
    <!-- <AtguiguInput
    :modelValue="username"
    @update:modelValue="username = $event"/> -->

  </div>
</template>

<script setup lang="ts" name="Father">
  import { ref } from 'vue'
  import AtguiguInput from './AtguiguInput.vue'

  let username = ref('张三')
</script>
子组件
<template>
  <input
    type="text"
    :value="modelValue"
    @input="emit('update:modelValue',(<HTMLInputElement>$event.target).value)"
  >
</template>

<script setup lang="ts" name="AtguiguInput">
  defineProps(['modelValue'])
  const emit = defineEmits(['update:modelValue'])
</script>
注意
对于原生事件$event就是事件对象有target属性 对于自定义事件,$event就是触发事件时传输的数据无target属性
自定义传输属性及方法 直接在v-model后加:xxx既可自定义 可以传输多组数据
父组件
<template>
  <div class="father">
    <h3>父组件</h3>
    <h4>{{ username }}</h4>
    <AtguiguInput v-model:Name="username" v-model:Passwd="passwd" />
  </div>
</template>

<script setup lang="ts" name="Father">
  import { ref } from 'vue'
  import AtguiguInput from './AtguiguInput.vue'

  let username = ref('张三')
  let passwd = ref('123456')

</script>
子组件
<template>
  <input
    type="text"
    :value="Name"
    @input="emit('update:Name',(<HTMLInputElement>$event.target).value)"
  >
      <br>

  <input
    type="text"
    :value="Passwd"
    @input="emit('update:Passwd',(<HTMLInputElement>$event.target).value)"
  >
</template>

<script setup lang="ts" name="AtguiguInput">
  defineProps(['Name','Passwd'])
  const emit = defineEmits(['update:Name','update:Passwd'])//此处都为 update:xxx
</script>
方法五 $artts
该方法适用于祖组件给孙组件传递数据,$artts是组件中为接收的数据对象,所以祖传给父,父将用不到的数据通过v-bind传递给孙
祖组件
<template>
  <div class="father">
    <h3>父组件</h3>
		<h4>a:{{ a }}</h4>
		<h4>b:{{ b }}</h4>
		<h4>c:{{ c }}</h4>
		<h4>d:{{ d }}</h4>
		<Child :a="a" :b="b" :c="c" :addA="addA" v-bind="{x:100,y:200}"/>
      	//传递 a = 1 b = 2 c = 3 addA:function addA(value) x = 100 y = 200
  </div>
</template>

<script setup lang="ts" name="Father">
	import Child from './Child.vue'
	import {ref} from 'vue'

	let a = ref(1)
	let b = ref(2)
	let c = ref(3)
	let d = ref(4)

	function addA(value:number){
		a.value += value
	}
</script>
父组件
<template>
	<div class="child">
		<h3>子组件</h3>
		<h4>a:{{ a }}</h4>
		<h4>其他:{{ $attrs }}</h4> //其他:{a : 1,b : 2,c : 3,addA:function addA(value),x : 100,y : 200}

		<GrandChild  v-bind="$attrs"/> // 传递 {a : 1,b : 2,c : 3,addA:function addA(value),x : 100,y : 200}
	</div>
</template>

<script setup lang="ts" name="Child">
	import GrandChild from './GrandChild.vue'

</script>
孙组件
<template>
	<div class="grand-child">
		<h3>孙组件</h3>
		<h4>a:{{ a }}</h4>
		<h4>b:{{ b }}</h4>
		<h4>c:{{ c }}</h4>
		<h4>x:{{ x }}</h4>
		<h4>y:{{ y }}</h4>
		<button @click="addA(5)">点我a+5</button>
	</div>
</template>

<script setup lang="ts" name="GrandChild">
	defineProps(['a','b','c','x','y','addA']) //接收数据
</script>
方式六 $refs和$parent
$refs用于父传子,$parent用于子传父 $refs和$parent获取的都是组件经过defineExpose暴漏的属性
父组件
<template>
	<div class="father">
		<h3>父组件</h3>
		<h4>房产:{{ house }}</h4>
		<button @click="modChildToy" >修改child1的玩具</button>
		<button @click="modChildCom" >修改child2的电脑</button>
		<button @click="getChild($refs)" >所有孩子的书变多</button> // 获取子组件的toy,book属性
		<Child1 /> // 将组件标签打上标记 c1
		<Child2 />
	</div>
</template>

<script setup lang="ts" name="Father">
	import Child1 from './Child1.vue'
	import Child2 from './Child2.vue'
	import { ref } from 'vue'

	let house = ref(4)

	function getChild(refs:{[key:string]:any}){
		for (let key in refs) {
			refs[key].book += 3
		}
	}
	defineExpose({house})// house暴漏到 $parent
</script>
子组件
<template>
  <div class="child1">
    <h3>子组件1</h3>
	<h4>玩具:{{ toy }}</h4>
	<h4>书籍:{{ book }}</h4>
	<h4>房产:{{ house }}</h4>
	<button @click="getFhouse($parent)">拿走父亲的房产</button> //获取父组件的 house属性
  </div>
</template>

<script setup lang="ts" name="Child1">
	import {ref} from 'vue'
	let toy = ref('奥特曼')
	let book = ref(3)
	let house = ref(0)
	function getFhouse(parent:any){
		if(parent.house > 0){
			parent.house -= 1
			house.value += 1
		}
	}
	defineExpose({toy,book})// toy,book 暴漏到 $refs
</script>
方法七 provide-inject
该方法用于祖孙之间通讯,无需中间者进行通讯 provied提供的数据会提供给组件的后代,即包括子\孙、重孙等组件,后代组件使用inject将数据接收
父组件
<template>
  <div class="father">
    <h3>父组件</h3>
    <h4>银子:{{ money }}</h4>
    <h4>汽车:{{ car.brand }} 价值:{{ car.price }}W</h4>
    <Child/>
  </div>
</template>

<script setup lang="ts" name="Father">
  import Child from './Child.vue'
  import { ref , reactive , provide} from 'vue'

  let car = reactive({
    brand:'XiaoMI',
    price:20
  })

  let money = ref(100)
  provide('money',money)//向后代提供数据{money:ref(100)}
  provide('car',car)//向后代提供数据{car:reactive({brand:'XiaoMI',price:20})}
</script>
孙组件
<template>
  <div class="grand-child">
    <h3>我是孙组件</h3>
    <h4>银子{{ x }}</h4>
  </div>
</template>

<script setup lang="ts" name="GrandChild">
  import {inject} from 'vue'
  let x = inject('money') //接收{money:ref(100)}
  // x = 100
</script>
当inject注射了一个未发送的数据时,会调用第二个参数充当默认值
默认值测试
<template>
  <div class="grand-child">
    <h3>我是孙组件</h3>
    <h4>银子{{ money }}</h4>
    <h4>爷爷给的车{{ car.brand }},价值{{ car.price }}</h4>
    <h4>测试:{{ test }}</h4> //无test属性传递
  </div>
</template>

<script setup lang="ts" name="GrandChild">
  import {inject} from 'vue'
  let money = inject('money')
  let car = inject('car')
  let test = inject('test','无test属性传递')
</script>
方法八 pinia
参考2.17
方法九 插槽
默认slot插槽
组件标签分为单标签和双标签两种,双标签可以配合子组件slot传输数据使用,双标签夹之间夹着被传输的数据
父组件
<template>
  <div class="father">
    <h3>父组件</h3>
    <div class="content">
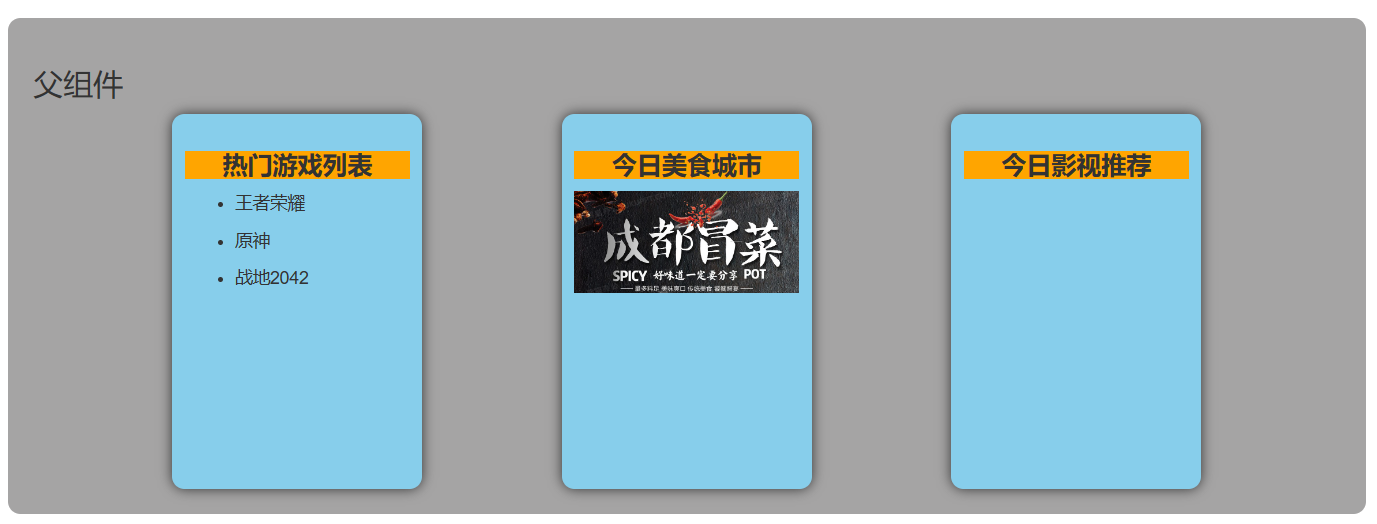
      <Category title="热门游戏列表" >
       	<ul v-for="g in games" :key="g.id"> // 传输 ul>li 到子组件对应的<slot></slot>位置
          <li>{{ g.name }}</li>
        </ul>
      </Category>
      <Category title="今日美食城市" >
        <img :src="imageUrl" > // 传输 img 到子组件对应的<slot></slot>位置
      </Category>
      <Category title="今日影视推荐" >
        <video :src="videoUrl"></video> // 传输 video 到子组件对应的<slot></slot>位置
      </Category>
    </div>
  </div>
</template>

<script setup lang="ts" name="Father">
  import Category from './Category.vue'
  import { ref , reactive } from 'vue'

  let games = reactive([
    {id:"asd1",name:"王者荣耀"},
    {id:"asd2",name:"原神"},
    {id:"asd3",name:"战地2042"}
  ])

  let imageUrl = ref("https://z1.ax1x.com/2023/11/19/piNxLo4.jpg")
  let videoUrl = ref("https://clips.com.vorwearts-gmbh.de/big_buck_bunny.mp4")
</script>
子组件
<template>
  <div class = 'category'>
    <h2>{{title}}</h2>
    <slot></slot> //将父组件中双标签夹住的数据放置此处
  </div>
</template>

<script setup lang='ts' name='Category'>
    defineProps(['title'])
</script>
效果图
注意
如果组件双标签内无内容,将显示slot插槽内的内容
具名插槽
顾名思义就是有名字的插槽,配合组件标签v-slot:指令使用,该指令只支持组件标签和template标签
父组件
<template>
  <div class="father">
    <h3>父组件</h3>
    <div class="content">
      <Category   >
        <template v-slot:s2>//该template内的内容放到 slot name="s2"中
          <ul>
            <li v-for="g in games" :key="g.id">{{ g.name }}</li>
          </ul>
        </template>
        <template v-slot:s1>//该template内的内容放到 slot name="s1"中
          <div>
            <h2>热门游戏列表</h2>
          </div>
        </template>
      </Category>
    </div>
  </div>
</template>

<script setup lang="ts" name="Father">
  import Category from './Category.vue'
  import { ref , reactive } from 'vue'

  let games = reactive([
    {id:"asd1",name:"王者荣耀"},
    {id:"asd2",name:"原神"},
    {id:"asd3",name:"战地2042"}
  ])
</script>
子组件
<template>
  <div class = 'category'>
    <slot name="s1">默认内容1</slot> //对应<template v-slot:s1></template>
    <slot name="s2">默认内容2</slot> //对应<template v-slot:s2></template>
  </div>
</template>

<script setup lang='ts' name='Category'>

</script>
v-slot 语法糖
将v-slot:直接替换为#,写成#xxx形式
<template>
  <div class="father">
    <h3>父组件</h3>
    <div class="content">
      <Category >
        <template #s2> // #s2 <= => v-slot:s2
          <video video :src="videoUrl"></video>
        </template>
        <template #s1> // #s1 <= => v-slot:s1
            <h2>今日影视推荐</h2>
        </template>
      </Category>
    </div>
  </div>
</template>
作用域插槽
数据在子组件中,渲染的解构在父组件中,数据经过Prop方式传递
使用slot的prop传输数据给v-slot="xxx"位置( xxx = {Prop对象} ),完成子组件数据作用域插槽渲染到父组件
父组件
<template>
  <div class="father">
    <h3>父组件</h3>
    <div class="content">
      <Game >
        <template v-slot="params"> //接收 slot 传输的Props对象
            <ul>
              <li v-for="g in params.games" :key="g.id">{{ g.name }}</li>
            </ul>
        </template>
      </Game>
    </div>
  </div>
</template>

<script setup lang="ts" name="Father">
  import Game from './Game.vue'
</script>
子组件
<template>
  <div class = 'game'>
    <h2>热门游戏列表</h2>xxx =
    <slot :games="games" x = "哈哈" y = "你好"></slot> // 传递 v-slot="xxx" xxx = {game:games,x:"哈哈",y:"你好"}
  </div>
</template>

<script setup lang='ts' name='Game'>
  import {reactive} from 'vue'
  let games = reactive([
    {id:'asgytdfats01',name:'英雄联盟'},
    {id:'asgytdfats02',name:'王者农药'},
    {id:'asgytdfats03',name:'红色警戒'},
    {id:'asgytdfats04',name:'斗罗大陆'}
  ])
</script>
使用v-slot:name="xxx"完成具名插槽和作用域插槽结合
2.19 其他API
vue3新加的API
2.19.1 shallowRef 和 shallowReactive
浅层的ref和reactive,只处理一层响应式
shallowRef
<script setup lang="ts" name="App">
	import { shallowRef } from 'vue'
	let person = shallowRef({
		name:"LY_C",
		age:22
	})

	function changePerson(){ //.value为ref对象的第一层 可以直接响应式修改整个对象
		person.value = {
            name = "test",
            age = 22
        };
	}

    function changeName(){ //.value.name 为ref第二层 不可以响应式修改
        person.value.name = "asd";
    }
</script>
shallowReactive
<script setup lang="ts" name="App">
	import { shallowReactive } from 'vue'

	let car = shallowReactive({ //shallReactive 声明一层响应化
		brand:"XiaoMI",
		price:21,
		option:{
			color:"Red",
			engine:"v8"
		}
	})

	function chanegBrand(){ // 可修改
		car.brand = "雅迪"
	}

	function chanegColor(){ // 第二层不可修改
		car.option.color = "Blue"
	}

	function changeEngin(){ // 第二层不可修改
		car.option.engine = "v1"
	}

	function changeCar(){ // 可修改 直接把第一层的数据全部替换
		Object.assign(car,{
			brand:"九号电动车",
			price:1,
			option:{
				color:"skyBlue",
				engine:"v3"
			}
		})
	}
</script>
2.19.2 readonly 和 shallowReadonly
readonly方法用于复制一份响应化对象只读副本,并且保持关联关系,readonly参数只能是响应化的数据(ref、reactive)
<script setup lang="ts" name="App">
	import { ref , readonly } from 'vue'
	let sum = ref(0)
	let sumCopy = readonly(sum)
	function addSum(){
		sum.value += 1
	}
	function addSumCopy(){
		sumCopy.value += 1 //报错 只读ref对象无法修改
	}
</script>
readonly ref 结构

shallowReadonly方法用于复制一份响应化对象浅层只读副本,只读层次和shallowRef和shllowReactive的层次一致
<script setup lang="ts" name="App">
	import {  reactive , shallowReadonly } from 'vue'

	let car = reactive({
		brand:"XiaoMI",
		option:{
			color:'红色',
			price:20
		}
	})

	let carCopy = shallowReadonly(car)

	function changeBrand(){ // 第一层数据不可修改
		carCopy.brand = "雅迪"
	}
	function changeColor(){ // 第二层数据可修改
		carCopy.option.color = "skyBlue"
	}
	function changePrice(){ // 第二层数据可修改
		carCopy.option.price = 22
	}
</script>
2.19.3 toRaw 和 markRaw
toRaw函数用于提取响应化对象的原始数据,返回的对象是非响应式的
<script setup lang="ts" name="App">
	import { toRaw , reactive } from 'vue'
	let person = reactive({
		name:"LY_C",
		age:22
	})
	let person2 = toRaw(person) // { "name": "LY_C", "age": 23 }
</script>
markRaw函数用于标记对象,使其永远不会变成响应式的
<script setup lang="ts" name="App">
	import { reactive , markRaw } from 'vue'
	let car = markRaw({
		brand:"XiaoMI",
		price:20
	})
	let car2 = reactive(car) //car2 响应式数据创建失败
</script>
2.19.4 customRef
自定义ref,自己写一个ref逻辑,经常会封装成一个hook函数方便多次使用
import { customRef } from 'vue'

export default function(initValue:string,delay:number){
    let timer:number
    let msg = customRef((track,trigger) => {
        return{
            get(){
                track() // 告诉Vue 时时刻刻监视msg
                return initValue
            },set(value){
                clearTimeout(timer)
                timer = setTimeout(() => {
                    initValue = value
                    trigger()// 告诉vue msg数据已经更新了
                },delay)
            }
        }
    })
    return {msg}
}
组件
<script setup lang="ts" name="App">
	import useMsgRef from '@/hooks/useMsgRef'

	let {msg} = useMsgRef("尚硅谷",2000)
</script>
2.20 新增组件
2.20.1 Teleprot
此组件用于将被包裹的结构放到指定位置,依旧保持模块逻辑,适用于弹窗, id属性只能写选择器
父组件
<template>
  <div class = 'outer'>
    <h2>我是App组件</h2>
    <img src="http://www.atguigu.com/images/index_new/logo.png" >
    <br>
    <Modal />
    </div>
</template>

<script setup lang='ts' name='App'>
    import Modal from './Modal.vue'
</script>
子组件
<template>
  <button @click="enable = true"> 展示弹窗</button>
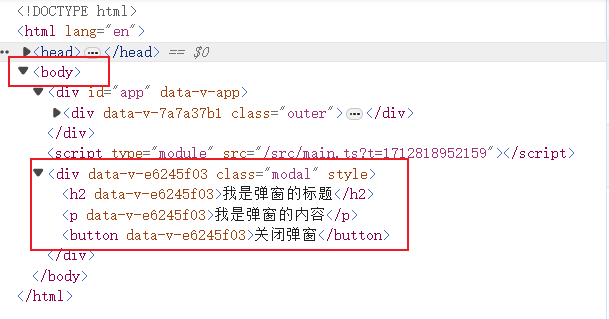
  <teleport to="body"> //将内部元素放到body中
    <div class = 'modal' v-show="enable">
      <h2>我是弹窗的标题</h2>
      <p>我是弹窗的内容</p>
      <button @click="enable = false">关闭弹窗</button>
    </div>
  </teleport>
</template>

<script setup lang='ts' name='Modal'>
  import {ref} from 'vue'
  let enable = ref(false)
</script>
渲染后结果
把modal组件从<div id='app'>中拆出放到body,并且保持逻辑
2.20.2 Suspense
当子组件包含异步任务,又想在网速慢时呈现一些东西,就是用Suspense组件
父组件
<template>
  <div class = 'app'>
    <h2>我是App组件</h2>
    <Suspense>
        <template v-slot:default> //异步任务完成时加载 template
            <Child/>
        </template>
        <template v-slot:fallback>//异步任务未完成时加载 template
            <h2>加载中....</h2>
        </template>
    </Suspense>
  </div>
</template>

<script setup lang='ts' name='App'>
    import {Suspense} from 'vue'
    import Child from '@/Child.vue'
</script>
子组件
<template>
    <div class = 'child'>

        <h2>我是Chlid组件</h2>
        <h2>{{ content }}</h2>
    </div>
</template>

<script setup lang='ts' name='Child'>
    import {ref} from 'vue'
    import axios from 'axios'

    let sum = ref(0)

    let {data:{content}} = await axios.get("https://api.uomg.com/api/rand.qinghua?format=json")
</script>
2.20.3 全局API转移到应用对象
-
component()将组件转为全局组件 -
config全局配置,比如说变量等 -
directive()注册全局指令 -
mount()挂载组件 -
unmount()卸载组件 -
use()使用插件
main.ts
import {createApp} from 'vue'
import App from './App.vue'
import Hello from './Hello.vue'


// 创建应用
const app = createApp(App)
app.component('Hello',Hello) // 注册全局组件
app.config.globalProperties.x = 99 // 注册全局属性

declare module 'vue'{ // 指定全局属性的类型
    interface ComponentCustomProperties{
        x:number
    }
}
app.directive('beauty',(element,{value})=>{ // 注册全局指令
    element.innerText += value
    element.style.color = 'green'
    element.style.backgroundColor = 'yellow'
})
// 挂载应用
app.mount('#app')
组件
<template>
    <div class = 'child'>
        <h2>我是Chlid组件</h2>
        <h2>当前求和为:{{ sum }}</h2>
        <h2 v-beauty="sum">好开心</h2>
    </div>
</template>

<script setup lang='ts' name='Child'>
    import { ref } from 'vue'

    let sum = ref(0)


</script>


![表情[qiang] - 极核GetShell](https://get-shell.com/wp-content/themes/zibll/img/smilies/qiang.gif) 顶顶顶
顶顶顶

