本文为个人学习记录,由于我也是初学者可能会存在错误,如有错误请指正
本文注重于一些网络安全测试库(IO读写、json、pymysql、socket、request、re、BeautifulSoup、Selenium、uiautomation以及smtplib)的核心写法以及AI识别图形验证码技术,只会涉及少量与其他语言相似的语法
一、附录
PIP第三方库查询地址:[PIP第三方库官网]
1.1 配置镜像
配置国内PIP镜像,编辑`C:\Users\{当前用户}\pip\pip.ini`
[global]
index-url = https://pypi.tuna.tsinghua.edu.cn/simple
[install]
trusted-host= pypi.tuna.tsinghua.edu.cn
或执行指令设置镜像
pip config set global.index-url https://pypi.tuna.tsinghua.edu.cn/simple/
pip config set install.trusted-host pypi.tuna.tsinghua.edu.cn
1.2 第三方库管理
- 直接安装
pip install xxxx- 指定版本号安装
pip install xxxx == x.x.x- 离线安装
pip install xxxx.whl- 卸载
pip uninstall xxxx- 查看已安装的第三方库
pip list1.3 PyCharm 使用事项
- 创建项目
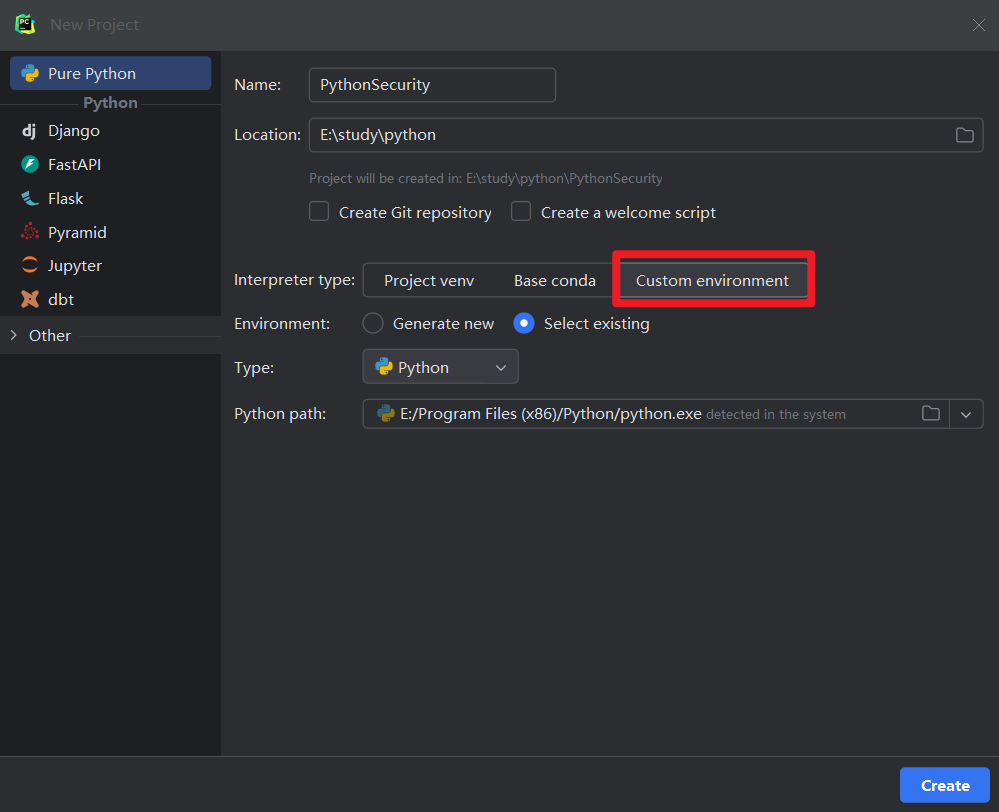
在创建新项目时,PyCharm会默认选中Project venv,该选项会将安装的第三方库等依赖都放置到此项目目录中,由于我们仅是测试和学习,所以优选选择自定义环境
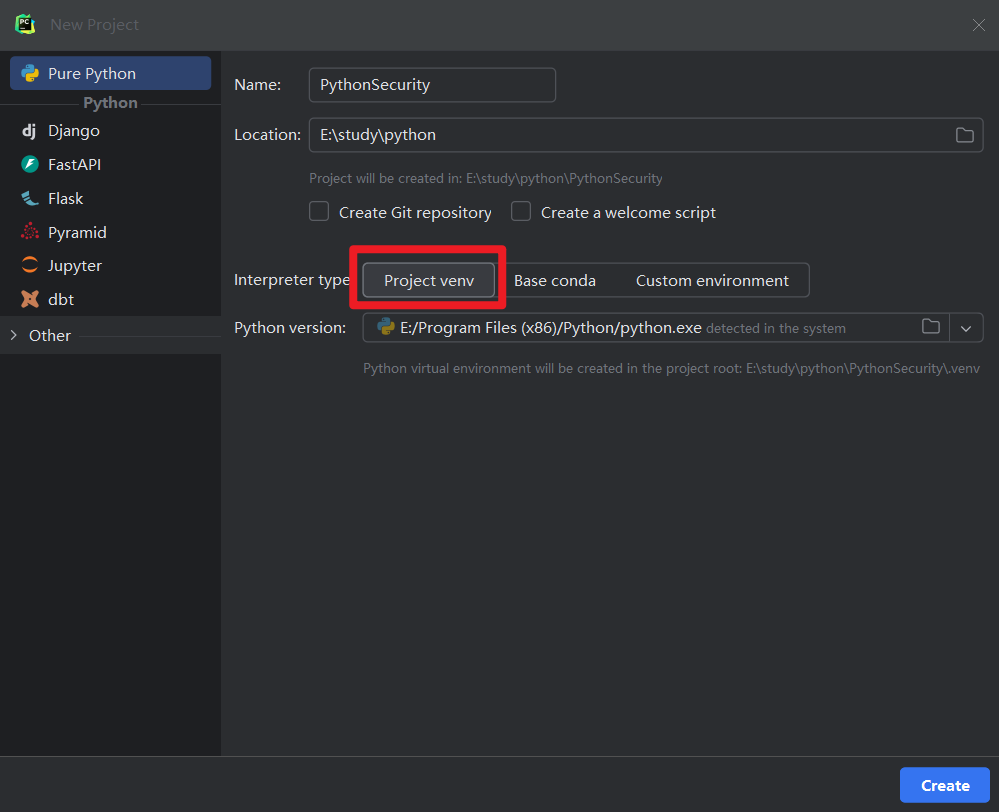
更改如下:
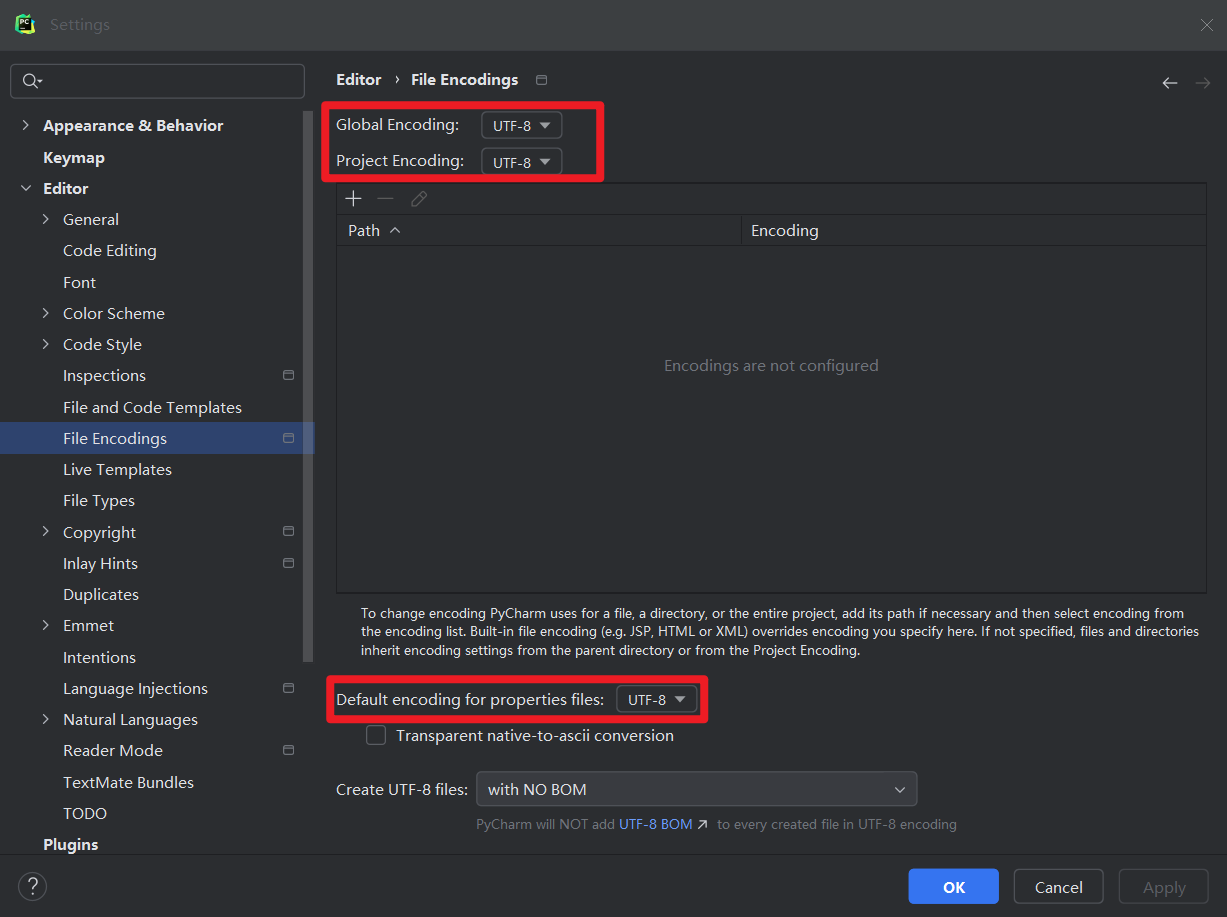
2. 解决乱码
Settings -> Editor -> File Encodings 设置如下
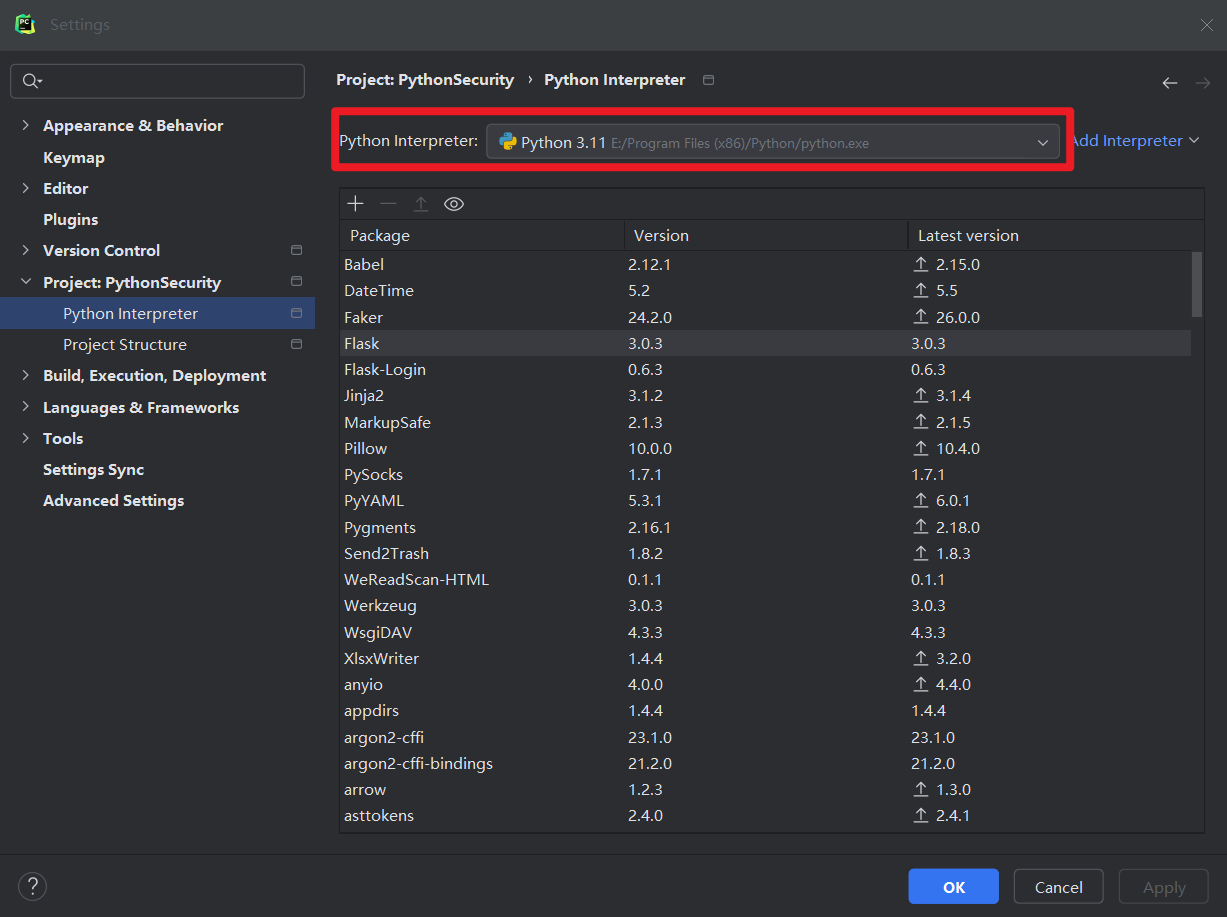
3. 更改解析器版本
Settings -> Project:xxxx -> Python Interperter
该选项卡中上方为解析器版本 下方为PIP第三方库依赖 可以使用下方加号进行安装第三方库
二、基础语法
2.1 数据类型
1. 数值
在python中不区分浮点数和整数 统称为数值,示例:
a=200
b=123.45
c=-1221
2. 字符串
可以使用单引号,双引号以及三引号进行声明字符串
其中三引号保持引号内的格式,示例:
a="hello"
b='你好'
c='''这是一个有三引号包裹的字符串'''
3. 布尔
必须使用首字母大写的True或False,示例:
a=True
b=False
4. 列表
相当于PHP中的索引数组,示例:
a=[1,2,3,4,3]
b=['张三','王五','赵六']
5. 字典
相当于PHP中的关联数组,示例:
a={'name':'LY_C','age':22,'sex':'男'}
6. 集合
就是不包含重复元素的列表,示例:
set1 = {1, 2, 3, 4}
set2 = set([4, 5, 6, 7])
7. 元组
与列表一致,定义之后无法修改,示例:
a=(1,2,3,4,3)8. 对象
用Class声明的对象
9. 空类型
None
2.2 注释
- 单号注释
# 这是单行注释- 多行注释
'''
这是多行注释
'''
2.3 输入输出
1. 输出
print('hello world')# hello world- 修改输出结束符
print函数默认以换行符为结尾进行输出,可以设置函数中end参数修改结尾字符,示例:
string = 'hello '
print(string, end='LY_C') # hello LY_C- 格式化输出
使用str.format()方法,基本使用方式如下:
student = {'name': 'LY_C', 'age': 22, 'sex': '男'}
print("用户名:{},年龄:{}".format(student['name'],student['age']))
# 用户名:LY_C,年龄:22使用f''格式化输出,示例:
student = {'name': 'LY_C', 'age': 22, 'sex': '男'}
print(f"用户名:{student['name']},年龄:{student['age']}")
# 用户名:LY_C,年龄:22
旧式:类似于C语言中的printf,但是使用`%`分割字符串模板和数据,示例:
student = {'name': 'LY_C', 'age': 22, 'sex': '男'}
print("用户名:%s,年龄:%d" % (student['name'],student['age']))
# 用户名:LY_C,年龄:22
2. 键盘输入
使用input()函数从键盘读取一行文本,示例:
str = input("请输入你的姓名")
print(f"用户名:{str}")
2.4 运算符
1. 算术运算符
次幂运算符:`**`
整除运算符:`//` (向下取整)
2.5 ASCII与字符以及进制转换
# ASCII码与字符转换
print(ord("A"))
print(chr(65))

# 进制转换
print(bin(78)) # 10进制转2进制
print(oct(78)) # 10进制转8
print(hex(78)) # 10进制转16
2.6 数值类型
1. 强制类型转换
int(x)将x转为一个整数,直接截取整数部分round(x)将x四舍五入转为一个整数round(x,y)将x保留y位小数四舍五入float(x)将x转为一个浮点数str(x)将x转为一个字符串
2. 随机数函数
需要导入random模块
import randomrandom.randint(x,y)生成一个闭区间[x,y]的整数随机数randmo.randrange(x,y)生成一个左闭右开的[x,y)的整数随机数randmo.randrange(x,y,z)生成一个左闭右开步长为z的[x,y)的整数随机数randmo.uniform(x,y)生成一个闭区间[x,y]的小数随机数randmo.choice(x)随机选出序列x中的一个元素,字符串、列表、元组均为序列
示例:
print(random.randint(1,10))
print(random.randrange(1,10,2))
print(random.uniform(1.5, 3.5))
print(random.choice("ABCMS") )
2.7 字符串类型
1. 字符串切片
示例:
str = "helloWoniu"
print(str[-1])    # 倒数一个字符 u
print(str[:5])    # 从第一个到第六个之前  hello
print(str[0:5])   # 从第一个到第六个之前  hello
print(str[1:-2])  # 从第二个到倒数第二个之前  elloWon
print(str[0:5:2]) # 从第一个到第六个之前 设置步长为2 hlo
2.字符串内置方法
len(x)字符串x的长度x.count('y')子串y在x中出现的次数x.split('y')x使用子串y进行分割 返回一个列表x.join(y)列表y使用x字符将每个元素进行拼接 形成一个字符串x.strip()去除x中不可见的字符 如转义字符、空格x.encode(y)将字符串x使用指定的y编码格式转为字节类型 y不填默认为UTF-8x.decode(y)将字节x使用指定的y编码格式转为字符串 y不填默认为UTF-8
示例:
print(len(str)) # 16
print(str.count(',')) # 3
print(str.split(',')) # ['zhang', 'li', 'wang', 'si']
list = ['zhang', 'li', 'wang', 'si'];
print('#'.join(list)) # zhang#li#wang#si
str4 = "     \n LY_C \n \t"
print(str4.strip()) # LY_C
str2 = "hello 你好"
target = str2.encode('GBK')
print(target) # b'hello \xc4\xe3\xba\xc3'
str3 = b'\xc4\xe3\xba\xc3'
print(str3.decode('GBK')) # 你好
2.7 列表、元组以及字典类
1. 列表&元组
- 可以使用字符串切片操作,直接切片列表以及元组
random.choice(list)随机选出list列表或元组的一个元素- 遍历列表和遍历元组操作一致
list = ['a','b',True,12345]
for i in range(0,len(list),2):   #range() 步长为2 生成一个左闭右开的列表
    print(list[i])

for i in list:
print(i)x.append(y)向列表x中添加y元素x.remove(y)使列表x中删除y元素x.sort()给列表x升序排序x.sort(reverse=True)给列表x降序排序list(y)将元组y转为列表tuple(x)将列表y转为元组
2. 字典
x.get(y)在x字典中获取键为y的值- 当赋给一个不存在键值时,会自动将该键值对添加至字典中
student = {'name': 'LY_C', 'age': 22, 'sex': '男'}
student['sexy'] = "不知道"
print(student) # {'name': 'LY_C', 'age': 22, 'sex': '男', 'sexy': '不知道'}x.upodate({y:z})将x中对应y的值改为z 如果y键值不存在时会自动添加至字典中
student = {'name': 'LY_C', 'age': 22, 'sex': '男'}
student.update({'age':"不知道"})
print(student) # {'name': 'LY_C', 'age': '不知道', 'sex': '男'}-
x.pop(y)在x字典中删除y键对应的键值对 - 使用
for in遍历字典,示例:
student = {'name': 'LY_C', 'age': 22, 'sex': '男'}
for key in student:
print(f"Key:{key}\t Value:{student[key]}")- 使用
x.values()`获取x字典的所有值 进行遍历,示例:
student = {'name': 'LY_C', 'age': 22, 'sex': '男'}
for value in student.values():
print(value)- 使用
x.keys()获取x字典的所有值 进行遍历,示例:
student = {'name': 'LY_C', 'age': 22, 'sex': '男'}
for key in student.keys():
print(key)- 使用
x.items()获取x字典的键值对 进行遍历,示例:
student = {'name': 'LY_C', 'age': 22, 'sex': '男'}
for k,v in student.items():
print(f"Key:{k}\t Value:{v}")
2.8 函数
def 函数名():的形式声明一个函数def add(a,b):
return a + b
print(add(1,2)) # 3
def test_01():
    print("hello")
x = test_01
print(x)  # <function test_01 at 0x000001E95152E660>
x() # 能够调用test_01函数
def test_01():
    print("hello")
def test_02(func):
    func()
test_02(test_01)
def test_arg_01(a,b,c=100):
    return a+b*c

print(test_arg_01(1, 2))def test_arg_01(a,b,c=100):
return a+b*c
print(test_arg_01(b = 1, a = 2))def test_arg_02(a,b,c=100,*args):
return a+b*c
test_arg_02(1,2,3,4,5,5,)
def test_arg_02(a,b,c=100,*args):
    print(args)  # (4, 5, 5)
    print(*args)  # 4 5 5
    return a+b*c
test_arg_02(1,2,3,4,5,5,)
def test_arg_03(a, b, c=100, *args, **kwargs):
    print(args)  # (4, 5, 5)
    print(kwargs)  # {'name': 'LY_C', 'age': 22}
    print(*kwargs)  # name age


test_arg_03(1, 2, 3, 4, 5, 5, name="LY_C", age=22)
2.9 模块和包
当函数或类等代码块保存于不同的源文件中(xxx.py这类源文件称之为模块),所有保存源文件的目录(包含`__init__.py`)称之为包
1. 引入以及注意事项
在同一包下不同模块中调用函数,需要使用`import`关键字引入模块,示例:
/basic/function.py
def test_01():
print("hello")
/basic/module.py 调用function模块中的test_01函数
import function
function.test_01()# hello直接使用import只能到模块级,不能到函数或类,需要使用`from xxx import xxx`才能到函数级
from basic.function import test_01
test_01()
注意:
当使用import关键字导入模块时,python首先会将模块导入对应位置然后进行py文件执行,也就是说会完整的执行一遍被导入的模块
为了防止别的模块重复执行部分代码,使用魔术变量`__name__`区分执行的文件,示例:
/basic/modeulea.py
def test_01():
print("hello")

def test_02(func):
func()

if __name__ == '__main__':
test_01()
/basic/modeule.py 引入魔术变量之后 test_01函数只会执行一次
import modulea
modulea.test_01() # hello__name__魔术变量当被别的模块调用时为模块的名称,在当前文件调用时为__main__
/basic/modeulea.py
print(__name__) # 执行本文件时为 __main__/basic/modeule.py
import modulea #引入了 modulea 此时会执行modulea的代码 输出为 modulea
注意:模块级变量和局部变量不同,如下: 看似是相同的变量其实不同
source = "模块级变量"

def test_01():
	source = "hello" # 修改的并不是全局变量 而是又声明了一个局部变量
print(source)如果想要在函数内修改模块级变量,需要加入global关键字引用,示例:
source = "模块级变量"

def test_01():
	global source
	source = "hello"
	print(source)
三、基础提升
3.1 IO操作
1. 文本文件读写
- 文件操作
mode=rf = open(file='Test.txt',encoding="utf-8")
content = f.read()
print(content)
f.close()mode种类:
========= ===============================================================
Character Meaning
--------- ---------------------------------------------------------------
'r' open for reading (default)
'w' open for writing, truncating the file first
'x' create a new file and open it for writing
'a' open for writing, appending to the end of the file if it exists
'b' binary mode
't' text mode (default)
'+' open a disk file for updating (reading and writing)
========= ===============================================================- 追加写入
mode='a'
f = open(file='Test.txt',mode='a',encoding="utf-8")
f.write("\n 你好初音未来")
f.close()- 覆盖写入
mode='w'如果文件不存在则自动创建
f = open(file='Temp.txt',mode='w',encoding="utf-8")
f.write("阿斯顿发山东发生的\n阿斯顿发山东发生的\n阿斯顿发山东发生的\n阿斯顿发山东发生的\n")
f.close()read(x)指定文件读取x个字符
f = open(file='Test.txt',encoding="utf-8")
content = f.read(10)
print(content)
f.close()readline(x)按行读取x个字符 默认为读取第一行
f = open(file='Test.txt',encoding="utf-8")
content = f.readline()
print(content)
f.close()readlines()按行全部读取,返回一个列表
f = open(file='Test.txt',encoding="utf-8")
content = f.readlines()
print(content)
f.close()
2. MySQL读写
安装pymysql库
pip install pymysql连接数据库,需要指定IP,用户名你,密码以及数据库名
import pymysql

conn = pymysql.connect(host='localhost',
user='root',
password='123456',
port=3306,
database='pythondemo',
charset='utf8')
在执行sql语句之前必须定义一个游标对象 默认返回元组
cur = conn.cursor()调用excute()执行sql语句
sql = 'select * from users'
cur.execute(sql)fetchall()获取所有结果集,返回一个二维元组
给游标对象传递DictCursor,使得返回结果为列表字典
from pymysql.cursors import DictCursor

conn = pymysql.connect(host='localhost',
user='root',
password='123456',
port=3306,
database='pythondemo',
charset='utf8')
cur = conn.cursor(DictCursor)
当使用pymysql进行数据的更改时,需要手动提交,同样也支持回滚
import pymysql
from pymysql.cursors import DictCursor

conn = pymysql.connect(host='localhost',
user='root',
password='123456',
port=3306,
database='pythondemo',
charset='utf8')
cur = conn.cursor()
sql = "update users set password = '123123123' where id = 1"
cur.execute(sql)
conn.commit()
conn.close()
3.2 异常处理
尝试执行try中的代码,若发生异常则执行except中的代码,最后不管有没有异常都执行finally
import pymysql
conn = None
try:
conn = pymysql.connect(host="localhost", user="root", passwd="123456", database="pythondemo")
cur = conn.cursor(DictCursor)
cur.execute(sql)
result = cur.fetchall()
return result
except:
raise Exception("数据库链接出错")
finally:
if conn is not None:
conn.close()
3.3 JSON处理
json.dumps(x)将x对象序列化成字符串json.dump(x)将对象序列化存储到文件中json.loads(x)将x JSON字符串反序列化对象json.load(x)将文件中JSON字符串反序列化对象
使用python自带的json库处理,MySQL返回的查询结果
import json
from common import queryMysql

result = queryMysql("select * from users")
jsonstr = json.dumps(result)
print(type(jsonstr))
print(jsonstr)
import json
from common import queryMysql
result = queryMysql("select * from users")
print(result)
jsonstr = json.dumps(result)
with open('users.json', 'w') as f:
json.dump(jsonstr, f)
with open('users.json', 'r') as f:
users = json.load(f)
print(users)3.4 装饰器
在函数或类前面,使用`@`进行声明的特殊操作,可以改变程序的执行流程
执行流程:
1. 查看是否包含装饰器,若有装饰器则优先执行装饰器
2. 将函数作为参数传入到装饰器函数中
3. 执行内部函数
4. 返回内部函数
def stat(func):
def inner():
start = time.time()
func()
end = time.time()
print(end - start)
return inner

@stat
def test2():
result = 9999
for i in range(10000000):
result = i * i
print(result)

test2()
执行流程如下:
1. 发现@stat
2. 执行stat(test2)
3. 执行inner()
4. return inner
四、网络通讯
4.1 socket
使用socket当做客户机,socket.socket()默认值为TCP链接,需要connect到服务器,并且发送字节数据
import socket

s = socket.socket()
s.connect(('10.27.99.200',554)) #IP 端口号

content = "welcome to network 你好"
s.send(content.encode("utf-8")) # 用utf8转换字符串为字节
s.close()使用socket当服务器,socket.socket()默认值为TCP链接,需要`bind`服务器并使用listen()开启监听,需要接受字节数据
def socket_server():
s = socket.socket()
s.bind(('10.27.99.115', 554))
s.listen() # 开启监听
while True:
chanel, client = s.accept() # 接受来着客户端的数据 信道 以及客户端信息
print(client)
message = chanel.recv(1024) # recv()接收数据包的缓冲大小
print(message.decode("utf-8"))
发送UDP数据包
socket.socket(type=socket.SOCK_DGRAM)4.2 HTTP
请求类型:
- GET 主要用于通过URL地址访问
- POST URL地址+请求数据,将请求数据提交给服务器
- PUT 与POST类似,主要用于Restful风格,用于更新数据
- DELETE 请求删除某个资源
响应类型
- 1xx 信息
- 2xx 正常
- 3xx 重定向
- 4xx 客户端错误
- 5xx 服务器端错误
Session/Cookie
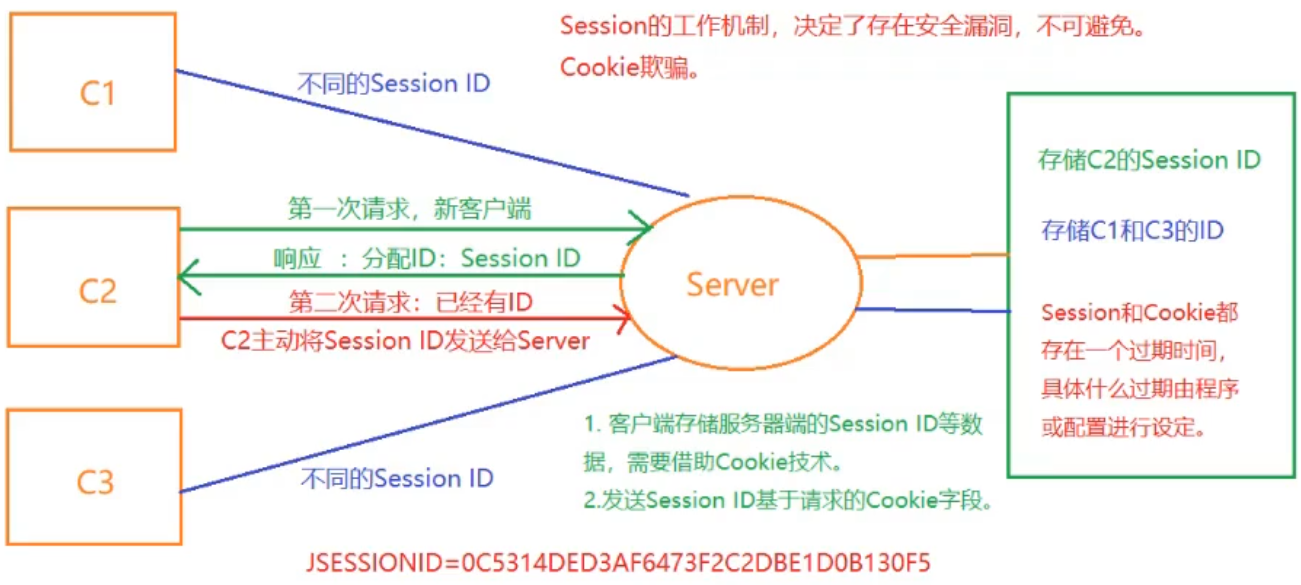
其他补充
- HTTP协议簇:HTTP/HTTPS/WebSocket(基于HTTP协议全双工通讯)/HLS(音频、视频)/SOAP(WebSever)
- HTTP协议属于应用层的文本型协议
- HTTP协议可以上传和下载任意类型文件(传输二进制文件)
- HTTP协议在互联网占比90%及以上
五、requests库处理HTTP
- 发送get请求
import requests
# 发送请求
x = requests.get('http://xxxxx)
x.encoding = "utf-8" #使用特定的编码集
# 返回网页内容
print(x.text)- 发送POST请求,需要传递两个参数一个是URL另一个是字典数据
import requests
data = {'userName':'233411410064','passWord':'123123','validCode':'MMMM'}
x = requests.post(url='http://xxxxx',data=data)
print(x.text)
print(x.headers) #获取头部信息- 文件下载
import requests
resp = requests.get('https://172.20.2.242:8080/z-os/img/self/self_login_bg.gif',verify=False)
with open('self_login_bg.gif', 'wb') as f:
f.write(resp.content) #二进制 以字节的方式访问- 文件上传
import requests
file = {'file':open('self_login_bg.gif', 'wb')}
resp = requests.post('http://xxxxxx', files=file)
print(resp.text)- 获取Cookie,使用Cookie上传文件
data = {'userName':'233411410064','passWord':'123123','validCode':'MMMM'}
x = requests.post(url='http://xxxxxx',data=data)
cookie = x.cookies
print(cookie)

file = {'file':open('self_login_bg.gif', 'wb')}
resp = requests.post('http://172.20.2.242:8080/z-os/img/self/', files=file ,cookies = cookie)
print(resp.text)- 使用Session对象实现自动维护Cookie 实现多次请求的Cookie一致
session = requests.session()

data = {'userName':'233411410064','passWord':'123123','validCode':'MMMM'}
x = session.post(url='http://xxxxxx',data=data)

file = {'file':open('self_login_bg.gif', 'wb')}
resp = session.post('http://xxxxxx', files=file)- 处理HTTPS,开启忽略证书错误
resp = requests.get('https:xxxxx',verify=False)暴力破解思路梳理:
1.使用Fiddler 4记录正常登录的HTTP数据包 一般账号密码为了安全性都是使用POST方式

2.查看提交的数据格式确定键名
userName=233411410064&passWord=03300038&validCode=Mnvy3.使用Session对象发送POST请求,请求中携带数据
session = requests.session()

data = {'userName':'233411410064','passWord':'123123','validCode':'MMMM'}
x = session.post(url='http://xxxxxx',data=data)
print(resp.text)
4.查看响应头格式,一般都为JSON格式的字符串
{"resultCode":200}5.使用json.loads()将相应信息转为对象,并读取resultCode键对应的值,方便使用循环暴力破解
六、爬虫
互联网:公网(不需要授权的情况就可以浏览的内容,搜索引擎的重点),深网(需要授权才使用的内容),暗网(非正式渠道,无法使用常规渠道访问)
爬取互联网公开信息,在正常情况下,也需要遵守一个规则:robots协议 如:www.baidu.com/robots.txt
所有的爬虫,核心是基于超链接,进而实现网站和网页的跳转
6.1 正则表达式
正则表达式使用格式:/表达式/修饰符
修饰符:
g全局匹配m多行匹配
直接写:/a/ 表示只匹配字母a
方括号:/a[A-Za-z]/ 表示匹配字母a拼接 一个任意大小写字母的字符串
尖角号:
- 在方括号内部表示取反 `/a[^A-Za-z]/`表示匹配字母a拼接 除了一个任意大小写字母的字符串
- 在方括号外部表示每行的开头 `/^a[A-Za-z]/`表示匹配每行以字母a拼接 除了一个任意大小写字母的字符串
美元符:匹配 /\.$/匹配以.为结尾的行
预定义字符:
\d匹配单个数字0-9\D匹配单个非数字字符\w匹配字母数字或_\W匹配非字母数字或_的字符\s匹配空白字符。如空格、Tab等等\s匹配非空白字符。如空格、Tab等等\b匹配以某字符为边界的单词,例:`/\bin/` 以in开头的单词 `/in\b/` 以in结尾的单词\B匹配以某字符不为边界的单词-
.匹配除了换行符之外的字符
量词:表示量词之前的字符重复的次数
+匹配一个或多个*匹配重复了零次或者多次?匹配重复零次或者一次{x}匹配重复x次{x,}匹配至少重复x次{x,y}匹配重复x到y次
问号 非贪婪匹配:按最小匹配条件匹配 {x,}?只匹配重复x次
分组:
()括号内部当成一个整体进行匹配 例:`/(at)*/`匹配由at组成的字符串atatat-
|匹配|两边任一个字符 例:/Pe|pe/匹配 Pe或pe
python 使用示例:
import re,requests

resp = requests.get("http://www.bilibili.com/")
links = re.findall('<a href = "(.+?)">',resp.text)
print(links)
6.2 BeautifulSoup
基于DOM文档树结构解析,当开始解析时,会将整个页面DOM树保存于内存中,进而实现查找
- 根据文档解构查找
import requests,urllib3
from bs4 import BeautifulSoup
urllib3.disable_warnings()
requests = requests.get("https://www.bilibili.com/index.html",verify=False)

html = BeautifulSoup(requests.text,"html.parser")

print(html.head.title)
print(html.head.title.string) #文本内容
print(html.div)- 根据标签查找
import requests,urllib3
from bs4 import BeautifulSoup
urllib3.disable_warnings()
requests = requests.get("https://www.bilibili.com/index.html",verify=False)


links = html.find_all('a')
for link in links:
print(link.get('href'))
images = html.find_all('img')
for image in images:
print(image['src'])- 根据标签id查找
import requests,urllib3
from bs4 import BeautifulSoup
urllib3.disable_warnings()
header = {"User-agent":"bingbot"}
requests = requests.get("http://xxxxx")

html = BeautifulSoup(requests.text,"html.parser")
validCode = html.find(id="validCode")
print(validCode)
- 根据标签class查找 由于class是一组元素所以使用find_all
import requests,urllib3
from bs4 import BeautifulSoup
urllib3.disable_warnings()
header = {"User-agent":"bingbot"}
requests = requests.get("http://172.20.2.242:8080/z-os/self/")

html = BeautifulSoup(requests.text,"html.parser")
login_codes = html.find_all(class_="login_codes")
print(login_codes)- 根据文本查找
import requests,urllib3
from bs4 import BeautifulSoup
urllib3.disable_warnings()
header = {"User-agent":"bingbot"}
requests = requests.get("http://172.20.2.242:8080/z-os/self/")

title = html.find(text="登录")
print(title.parent) #父元素- 根据xpath风格进行查找
import requests,urllib3
from bs4 import BeautifulSoup
urllib3.disable_warnings()
header = {"User-agent":"bingbot"}
requests = requests.get("http://172.20.2.242:8080/z-os/self/")


title = html.find_all('button',{'class':'login_button'})
# 查找class = login_button 的 button
print(title)- 根据CSS选择器进行查找
titles = html.select('.input_code') # class='input_code'
print(titles)
titles = html.select('#input_code') # id='input_code'
print(titles)
七、多线程以及流量泛洪
每一个应用程序至少拥有一个进程 并且拥有PID和独立的内存空间
每个进程至少拥有一个线程 线程没有独立的内存空间
import threading, time

def test02():
print(threading.current_thread().name)
print(time.strftime('%Y-%m-%d %H:%M:%S'))
time.sleep(1)


if __name__ == '__main__':
for i in range(5): #开启五个线程 目标为test02函数
t = threading.Thread(target=test02)
t.start()

test02()
八、基于Selenium操作Web界面
如果协议通信被加密或无法了解其协议构成,是无法通过协议进行处理。此时,可以考虑模拟UI操作,进而实现对应的部分功能
基于UI 处理Windows端应用使用uiautomation,处理安卓端应用使用appium
通讯机制:Python模拟客户端发送HTTP请求给webDriver,webDriver再驱动浏览器
- 配置环境
1. 下载webdriver[selenium · PyPI]
2. 将webdriver放到浏览器安装目录下C:\Program Files (x86)\Microsoft\Edge\Application
3. 将C:\Program Files (x86)\Microsoft\Edge\Application添加到系统环境变量中
- 简单打开网址示例:
from selenium import webdriver

#示例化webdriver对象,用于初始化浏览器操作
op = webdriver.EdgeOptions()
#selenium 4 必须设置浏览器选项,否则自动关闭
op.add_experimental_option("detach",True)
driver = webdriver.Edge(options=op)
#访问
driver.get("http://xxxxxx")- 使用DOM操作
#find_element 查找元素 send_keys填写值
driver.find_element(By.ID,"userName").send_keys("admin")
driver.find_element(By.ID,"pwd").send_keys("123456")
driver.find_element(By.XPATH,"//input[@id='validCode']").send_keys("123456")
uiautomation
使用uispy识别应用元素,红色为uispy标记的
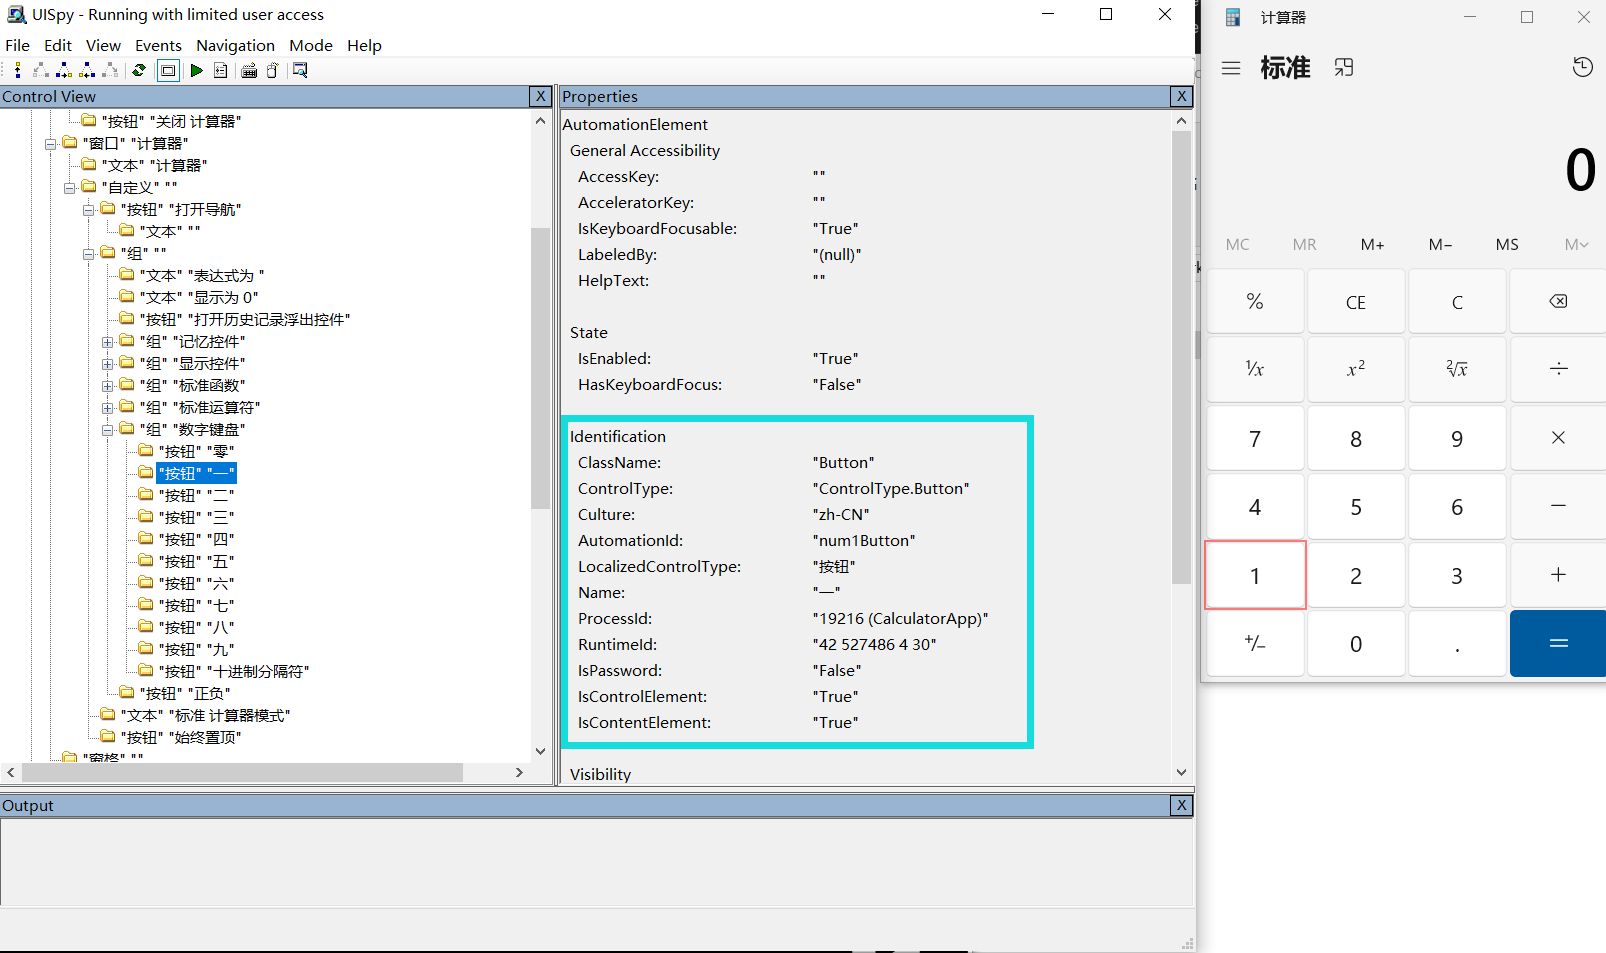
查看最顶层的Identification,
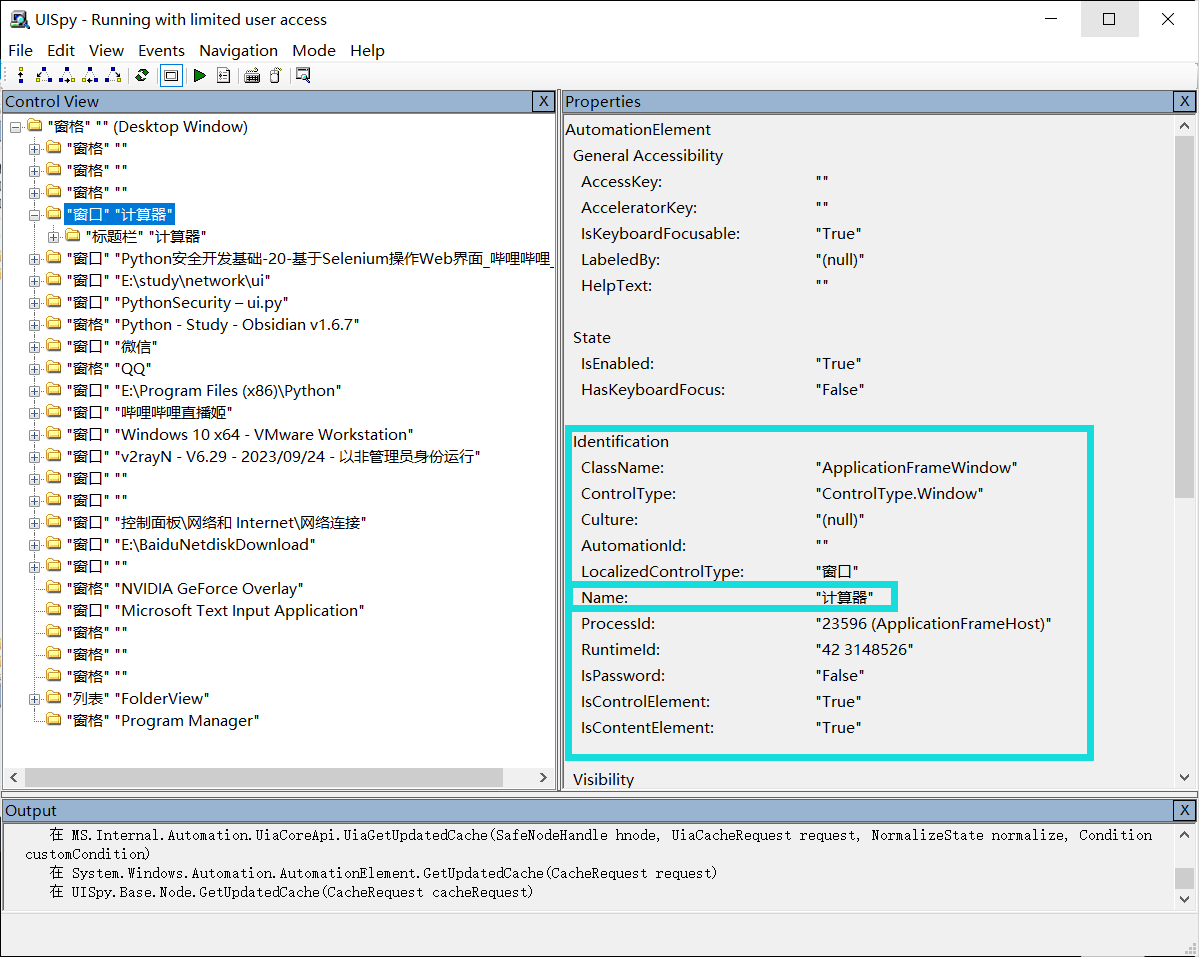
使用Name属性获取窗口
import uiautomation
calc = uiautomation.WindowControl(Name="计算器")使用按钮的AutomationId属性获取元素
calc.ButtonControl(AutomationId="num0Button").Click()完整实现1+5=点击
import uiautomation
calc = uiautomation.WindowControl(Name="计算器")
calc.ButtonControl(AutomationId="num1Button").Click()
calc.ButtonControl(AutomationId="plusButton").Click()
calc.ButtonControl(AutomationId="num5Button").Click()
calc.ButtonControl(AutomationId="equalButton").Click()
8.2 同步Selenium和reusests的session
# 示例化webdriver对象,用于初始化浏览器操作
op = webdriver.EdgeOptions()
# selenium 4 必须设置浏览器选项,否则自动关闭
op.add_experimental_option("detach", True)
driver = webdriver.Edge(options=op)
# 访问
driver.get("http://172.20.2.242:8080/z-os/self/")
sel_cookies = driver.get_cookies()
jar = requests.cookies.RequestsCookieJar() # 先构建RequestsCookieJar对象
for i in sel_cookies:
    jar.set(i['name'], i['value'], domain=i['domain'], path=i['path'])
session.cookies.update(jar)
九、验证码处理
9.1 部署ai模型
pip install datasets==2.18.0
pip install opencv-pythonfrom modelscope.hub.snapshot_download import snapshot_download
model_dir = snapshot_download('xiaolv/ocr_small')
print(model_dir)# 模型下载目录/xiaolv/ocr_smallfrom modelscope.pipelines import pipeline
from modelscope.utils.constant import Tasks
import gradio as gr
import os
import requests
class xiaolv_ocr_model():
def __init__(self):
model_small = r"./xiaolv/ocr_small" # 模型目录
self.ocr_recognition_small = pipeline(Tasks.ocr_recognition, model=model_small)
def run(self,pict_path, context=[]):
result = self.ocr_recognition_small(pict_path)
context += [str(result['text'][0])]
responses = [(u, b) for u, b in zip(context[::2], context[1::2])]
print(f"识别的结果为:{result}")
# os.remove(pict_path) 识别完成删除验证码图片
return responses,context
if __name__ == "__main__":
pict_path = r"./img/validCodeImg.png" #验证码图片位置
ocr_model = xiaolv_ocr_model()
ocr_model.run(pict_path)十、发送邮件SMTP
- SMTP:发送邮件
- POP3:邮局协议
- IMAP:网络邮件访问协议 比POP3实时性更强
import smtplib # smtp处理连接问题
from email.mime.multipart import MIMEMultipart
from email.mime.text import MIMEText

msg = MIMEMultipart()
msg['Subject'] = 'Python测试邮件' # 主题
msg['From'] = 'xxxxxxxx@qq.com' # 发送者
msg['To'] = 'yyyyyyyyy@qq.com' # 接受者

body = """
    <div style="font-size:30px;color:blue">这是邮件正文</div>
    <div style="font-size:30px;color:red">new bee</div>"""
content = MIMEText(body, 'html', 'utf-8') # 消息主体

msg.attach(content)

smtpObj = smtplib.SMTP()
smtpObj.connect('smtp.qq.com',587) # 链接服务器
smtpObj.login(user = 'xxxxxxxxx@qq.com',password = 'zqypbmqhlrondeif') # 登录
smtpObj.sendmail(msg['From'],msg['To'],str(msg)) # 发送信息
smtpObj.quit() # 关闭连接
WS抓包分析:
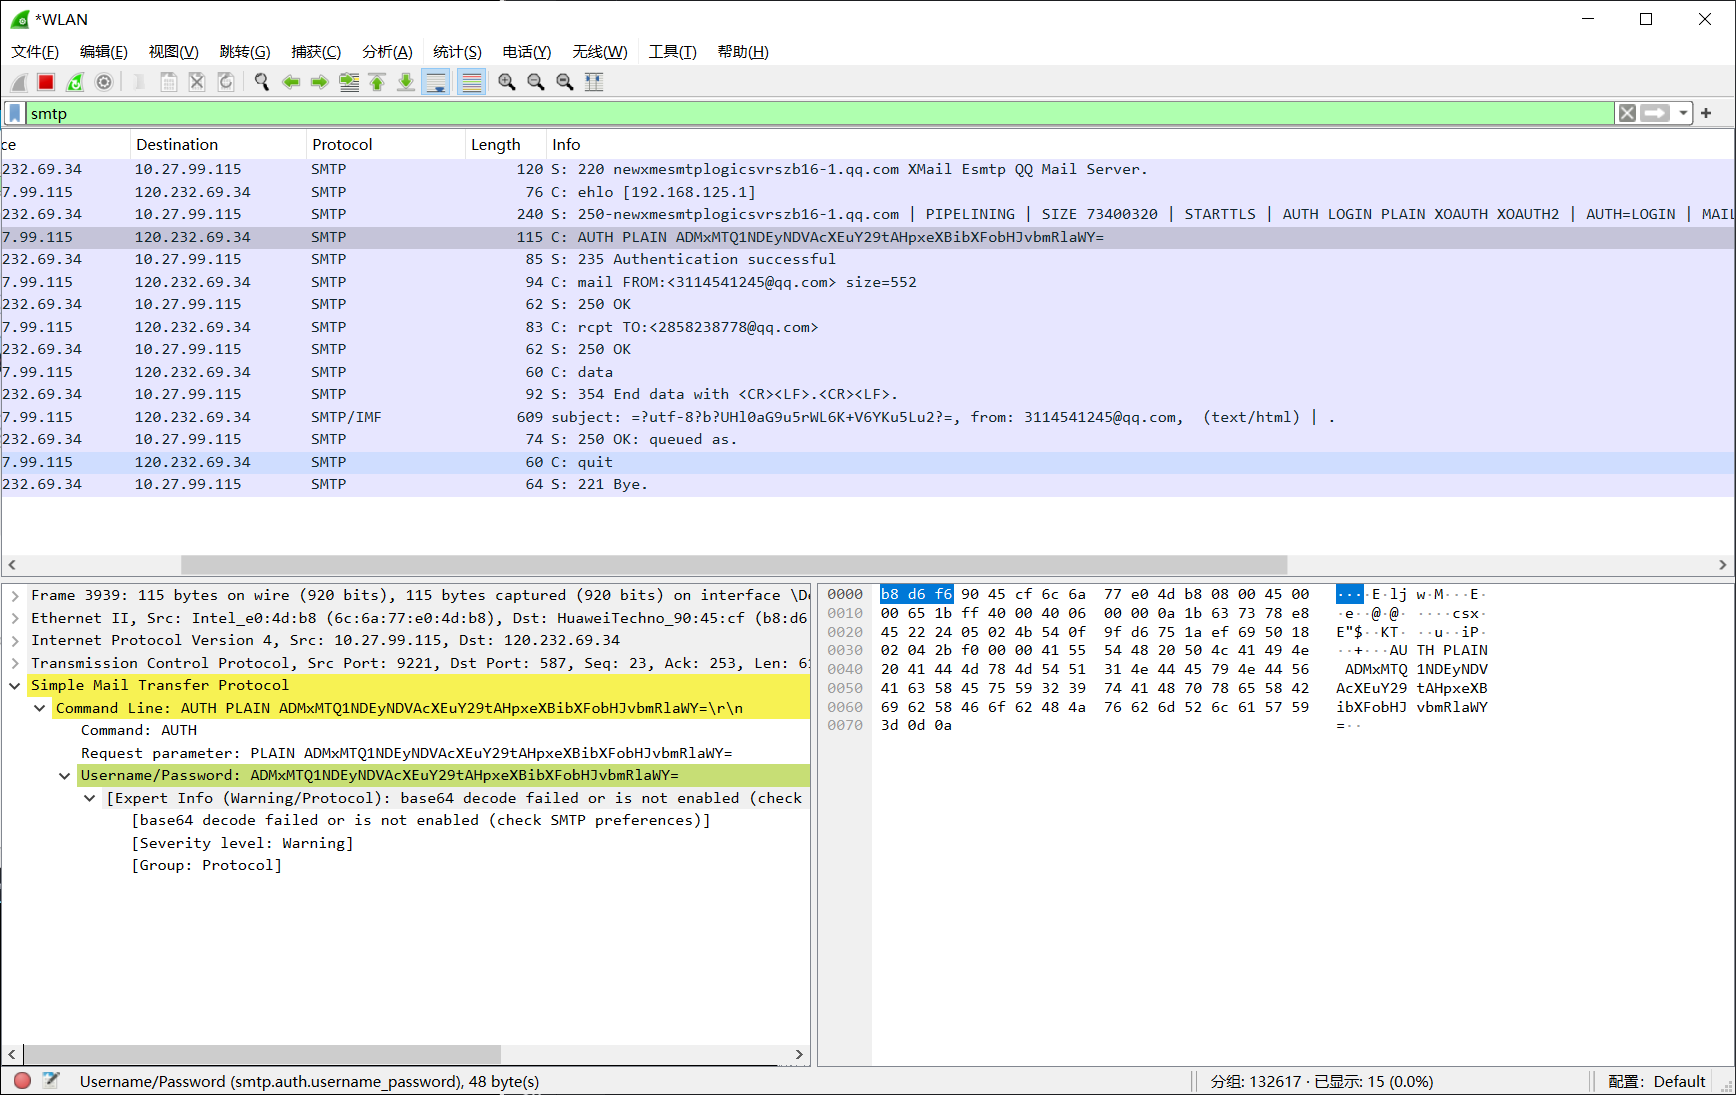
使用明文传输base64 ,使用python进行解密:
import base64
source = "ADMxMTQ1NDEyNDVAcXEuY29tAHpxeXBibXFobHJvbmRlaWY="
print(base64.b64decode(source))
邮件正文消息 同样使用base64
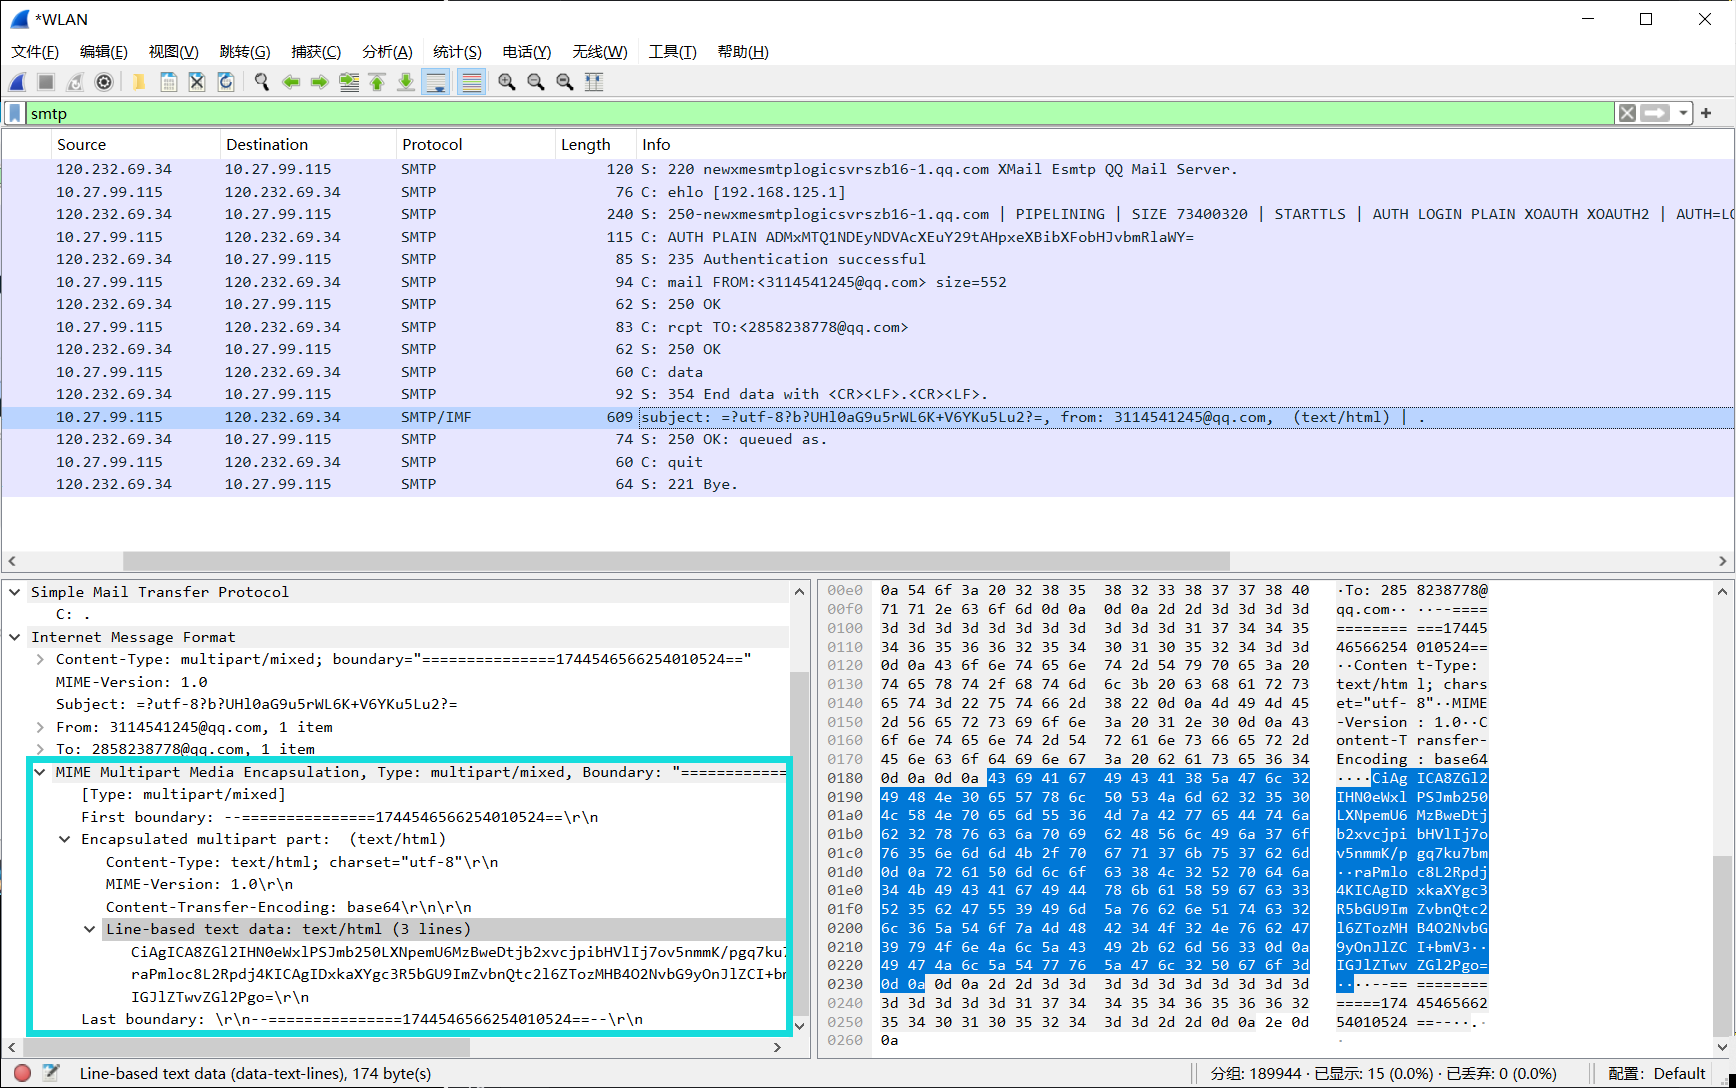
添加附件
attachment = MIMEApplication(open('self_login_bg.gif','rb').read())
filename = 'self_login_bg.gif'
attachment.add_header('Content-Disposition', 'attachment', filename=filename)
msg.attach(attachment)
十一、SSH以及Redis连接
SSH:
import paramiko

transport = paramiko.Transport(('<IP>',22)) # 实例化隧道
transport.connect(username='root',password='<PASSWORD>')

ssh = paramiko.SSHClient() # 实例化SSH客户端
ssh._transport = transport
sftp = paramiko.SFTPClient.from_transport(transport)
# 标准输入 标准输出 执行错误
stdin, stdout, stderr = ssh.exec_command('ls -al')
print(stdout.read().decode())
# 传输文件./test.txt 到远程服务器 /opt/test.txtsftp.put('./test.txt','/opt/test.txt')
# 从远程服务器下载/opt/test.txt文件到./test.txt
sftp.get('/opt/test.txt','./test.txt')
redis
基于TCP的通讯
1.核心协议体
*2 # 下述指令有两个字符串组成
$4 # 后续的字符串长度为4
auth
$6 # 后续的字符串长度为6
123456
使用socket通讯执行redis
import socket

s = socket.socket()
s.connect(('<IP>',6379))
s.send('*2\r\n$4\r\nauth\r\n$6\r\n123456'.encode())
使用redis包执行
import redis
red = redis.Redis(host='localhost', port=6379,password="123456", db=0)
red.set('name','LY_C')
print(red.get('name').decode())
十二、面向对象
没什么好说的和Java差不多,简单看一下
示例代码:
class Person:
course = "微机课"
# 定义构造方法:实例化是会自动调用方法,并且可以将示例变量定义在构造方法中
# self形参:类实例的引用,与其他语言当中的this关键字相同 必须放到类方法的第一个形参
def __init__(self,name,age,nation,addr):
# 定义示例属性
self.name = name
self.age = age
self.nation = nation
self.addr = addr
# 类释放内存之前调用的方法
def __del__(self):
print("类实例正在被释放")

# 打印类示例调用的方法
def __str__(self):
return f"姓名:{self.name}\n年龄:{self.age}"

def _test01(self):
print("受保护的方法")

def __test02(self):
print("私有的方法")

def talk(self):
print("Person 正在说话")

def work(self,type):
print(f"Person 正在做{self,type}工作")
#使用 classmethod 装饰器的方法为静态方法
@classmethod
def teach(cls):
print(cls.course)
if __name__ == '__main__':
p = Person('LY_C',22,'汉族',"ZZ")
print(p)
Person.teach()
运行结果:
姓名:LY_C
年龄:22
微机课
类实例正在被释放
继承:
class Man(Person):
def telk(self):
print('子类在说话')

if __name__ == '__main__':
man = Man('LY_C',22,'汉族',"ZZ")
man.telk()


![表情[baoquan] - 极核GetShell](https://get-shell.com/wp-content/themes/zibll/img/smilies/baoquan.gif)
![表情[se] - 极核GetShell](https://get-shell.com/wp-content/themes/zibll/img/smilies/se.gif)

